New Term Checklist
A checklist to provide faculty timely reminders of routine Canvas tasks before and after each term
Browse Canvas Instructor Guide
Faculty New Term Checklist
This checklist provides faculty timely reminders of routine Canvas course tasks before and after each term.
At the Start of a New Term
Step 1: Import Content into the Course Shell
Course sites are created around 8 weeks prior to the term. If you would like to start working on your course prior to that time, contact CDLI to request a prep space.
Can’t find next quarter’s course? Your Canvas Dashboard is organized with "Published Courses" listed first, and "Unpublished Courses" listed below. You can also customize your course list to make specific courses easier to find.
- Copying course content from a previous term?
- Use the course import tool to copy content from another Canvas course.
- Note: If you performed a content import in error and would like to start over, please contact CDLI for assistance resetting your shell back to its initial state.
- Starting from scratch?
- Download one of CDLI's Canvas course templates and import the template into your course shell.
- Uploading lots of new files into the course?
- Expedite the process by bulk uploading files to a course.
- Add your Syllabus to the course
- There are many places you can post your course syllabus in Canvas.
- You can add the Syllabus as a link in your course navigation menu and then edit the syllabus page.
- You can add your syllabus as a PDF to a Canvas page.
- You may decide to set your Syllabus page as the Home Page for your Canvas course.
- Note: If you use a CDLI Canvas Course template, the syllabus is included as a link in the course navigation menu and is linked to from the home page but it is not set as the home page for your course.
Step 2: Double-check course dates, settings, links, syllabus & student roster
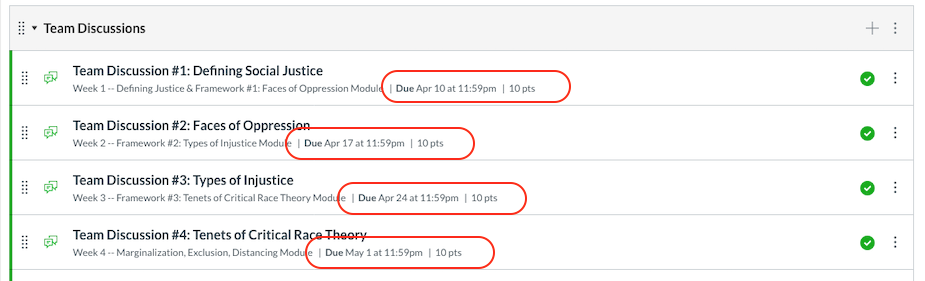
- Update due dates and availability dates for assignments, discussions, and quizzes
- What is the difference between assignment due dates and availability dates?
- If you go to your Assignments list (Assignments in course navigation), you see all your assignments, discussions, and quizzes together. You can also drag and drop them into order to make checking dates even easier.
- Consider grades settings
- Select a grade posting policy for your course.
- By default, grades are visible to students as soon as they are entered into the gradebook.
- If you want to choose when to post grades, use the "Manually Post Grades" grading policy.
- When students access their individual grade reports they have access to grade distribution graphs that display average student scores for each course assignment.
- Hide grade distribution graphs from students if you do not want them to have access to this information.
- Select a grade posting policy for your course.
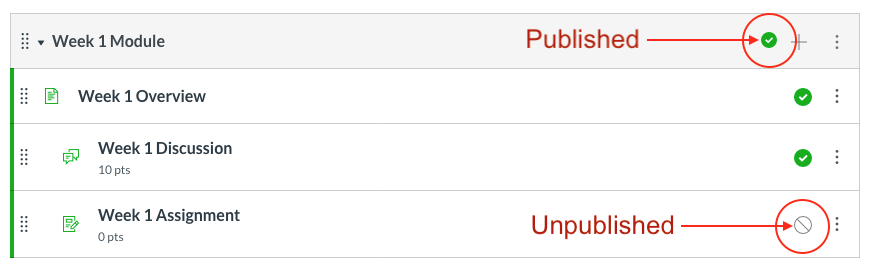
- Double-check that modules, pages, and assignments are published
- Unless you have specific items that you are deliberately keeping from students, it’s best to publish everything in your course. Check that all the modules are published. If the module itself is not published, students cannot access any materials within the module.
- Here are instructions to publish or unpublish Assignments, Quizzes, Discussions, Modules, and Pages.
- Simplify course navigation *STRONGLY RECOMMENDED*
- Hide unused or redundant links in your course navigation menu to help students more easily navigate your course.
- How do I reorder and/or hide links in my Course Navigation menu?
- Tip: CDLI recommends that you hide "Pages" and "Files" from your course navigation. The most commonly used course tabs are, in order: 1) Home 2) Syllabus 3) Announcements 4) Modules 5) Grades 6) People.
- Check for broken links
- Links to other websites (e.g.: news articles, YouTube videos, etc.) may become broken because they are maintained by entities outside Canvas at Seattle University. Be sure to check all of your links before you publish your course.
- Tip: Use the link validator to quickly and easily check for broken links throughout your course. If the link validator finds broken links, it will direct you to the error so you can fix it.
- Review Your Syllabus
- To ensure your course syllabus aligns with university requirements, please take a moment to compare it with the Syllabus Template and make any necessary changes.
- Check student roster
- Access the People Tab to find the student roster in your course.
- Compare Canvas course student enrollments to the roster in mySeattleU.
- If you find a discrepancy, email CDLI to fix the problem before the quarter begins.
Step 3 (If not meeting face-to-face): Set up your Zoom meetings for the quarter
Schedule your Zoom meetings for your class and office hours using the Zoom interface in Canvas. Scheduling your class Zoom meetings through the Canvas interface will ensure that all the Zoom meetings for that class will appear in the Zoom link in Canvas course navigation. Use the CDLI Faculty Guide for scheduling Zoom meetings in Canvas for step-by-step instructions.
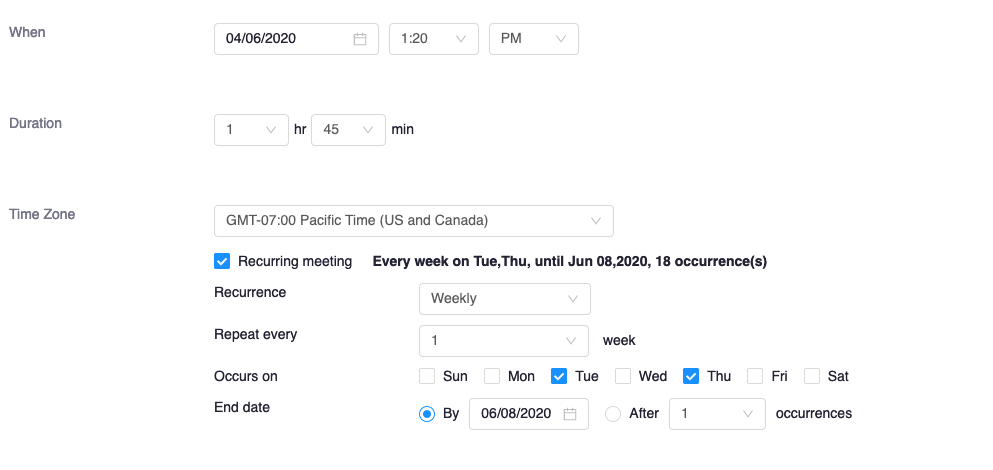
If your meetings will be the same day(s) and time each week, we suggest using the Recurring meeting function when setting up your Zoom meetings. Set up one meeting and then configuring that meeting to recur weekly on the same days (see below).
(Also remember to check Record the meeting automatically in the cloud so your meetings will be archived for students who might be sick or have connectivity problems that day. If you record to the Cloud, Zoom will automatically caption your recording, provide a searchable transcript, and it can easily be published in the Canvas-Zoom interface under the Cloud Recordings tab.)

Step 4: Preview and publish your course
- Preview the course using "Student View"
- View your course from your students' perspective using "student view."
- Tip: Test out your quizzes using student view. Then click "reset student" to clear activity from the Test Student.
- Note: Don't forget to click "leave student view" to return to your instructor account.
- Publish your course
- You must publish your course before students can access the course and its contents. Students cannot see unpublished courses and unpublished content.
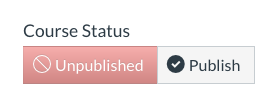
- Note: If you accidentally publish before you are ready for the students to access the course, you can just click Unpublish to restrict access again.
- But once a published course contains graded student submissions, the course status buttons will disappear and the course can no longer be unpublished. If you absolutely need to restrict access once your course has received student submissions, you can go into Settings and change the course start date to a future date and then check the box to restrict students from viewing course before term start date.
- You must publish your course before students can access the course and its contents. Students cannot see unpublished courses and unpublished content.
- Need to publish your course but not all of your course content?
- Any modules, pages, assignments, discussions, or quizzes that are not yet ready for students to view can be unpublished by clicking the green circle with the checkmark in it; it will change to a grey circle with a line through it to indicate that it is unpublished.
- Again, double-check your course using Student View to ensure that students are seeing what you want them to see.
- Any modules, pages, assignments, discussions, or quizzes that are not yet ready for students to view can be unpublished by clicking the green circle with the checkmark in it; it will change to a grey circle with a line through it to indicate that it is unpublished.
Step 5: Welcome students to your course
- Considerations
- Introduce how you are using Canvas (e.g.: Modules organization or Files structure, Syllabus, Assignment submissions, Discussions, Quizzes, Calendar, etc.)
- Indicate how you will communicate with students and how they should communicate with you (e.g. Announcements, Inbox)
- Show students how to manage their Course Notification preferences (recommend they keep Announcements and Inbox settings on ASAP).
- Provide a link to the CDLI Help Center, where students can find self-help guides and information on getting help if something isn't working.
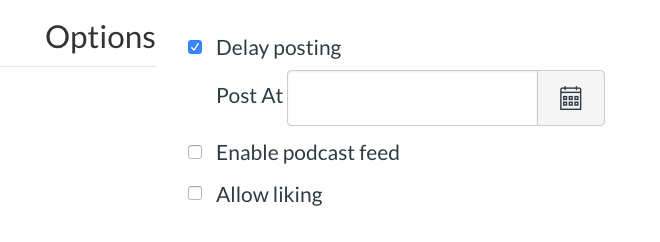
- Post a course announcement
- Please see the Canvas guide: How do I make an Announcement in my course?
- Note: Canvas will only send Announcement messages to students’ SU emails if the Announcement is posted after the course is published.
- If desired, you can show recent announcements at the top of the Course Home Page.
- Working ahead? You can delay posting an announcement until a specific future date.
- Tip: You can open course Announcements for student comments, which are visible to the entire class.
- Give students a tour of your site during your first class
- In addition to a course announcement, you may also choose to log into Student View to show your Canvas course to students using the projector in your classroom, over screen share in Zoom, or in an asynchronous course, recording a short Canvas tour video.
At the End of the Term
Step 1: Submit Final Grades to Registrar using mySeattleU
- Submit grades to the Registrar using mySeattleU
- Please see the Registrar's Office website for instructions, grading information, and grading policies.
- Note: Final grades are submitted through mySeattleU - not through Canvas!
Step 2: (Optional) Disable Student Access to your Course
- "Un-publish" your course to disable student access
★ Note: Courses "conclude" and become read-only for students on the last day to dispute grades (3 weeks into the following term & 3 weeks into the Fall term for Spring courses).
Step 3: (Suggested) Archive Course Content and Student Artifacts
★ Note: Canvas courses and student records are not deleted from the system. Please follow the steps below if you’d like to download course data to your Seattle University OneDrive storage space.
- Archive course content
- Export your Canvas course to save a copy of the course on your local computer, or share a copy of the course with a colleague.
- Tip: Have a large course? Canvas will email you when the export is ready to download.
- Archive student grades
- Export grades from the Gradebook and save as a CSV file.
- Note: Student grades are FERPA-protected and should only be saved in a secure location, such as your Seattle University OneDrive storage space.
- Archive student assignment submissions
- You may need examples of student work for program assessment or accreditation purposes, for example. Bulk download all student submissions for an assignment.
- View quiz statistics and download a CSV file to view quiz student analysis report or quiz item analysis report.
- Note: Student work is FERPA-protected and should only be saved in a secure location, such as your Seattle University OneDrive storage space.
Canvas Quicklinks
/24x0:359x445/prod01/channel_34/media/seattle-university/center-for-digital-learning-and-innovation/images/Canvas-login--quicklinks.png)
Canvas Login
Login to Canvas and access your courses
/24x0:359x445/prod01/channel_34/media/seattle-university/center-for-digital-learning-and-innovation/images/Canvas-support--quicklinks.png)
24/7 Canvas Support
Student Support Hotline: 844-668-0893. Faculty Support Hotline: 833-250-2081.
/24x0:359x445/prod01/channel_34/media/seattle-university/center-for-digital-learning-and-innovation/images/Canvas-forgot-password--quicklinks.png)
Forgot your password?
Reset your password for your SU account