Zoom
Get guidance, support, tips and tricks for faculty teaching with Zoom.
Teaching and Learning Synchronously Online with Zoom
 Seattle University faculty, staff and students will receive a Zoom Pro account which will allow for meetings of unlimited length and up to 300 participants; simply log into the SU Zoom Web Portal (https://seattleu.zoom.us) using your SU credentials to obtain your Zoom Pro account.
Zoom is a powerful and intuitive video conferencing, screen sharing and screen recording tool that works on all browsers and most mobile devices. In addition to supporting synchronous video calls, Zoom can record your screen while you present materials. This recording can then be added to Canvas for viewing.
Login to the Seattle U Zoom Portal
- Seattle University Zoom Portal
- Username: username@seattleu.edu // Password: your SU password
Get Help with Zoom
Installing Zoom
- Download and Install Zoom on a Computer
- Getting Started on a Mobile Device
- Zoom System Requirements & Internet Bandwidth Requirements (Zoom works on most desktops, laptops, and mobile tablet/phones, and will be optimized for the best experience based on the speed of your internet connection)
Check for Zoom Updates
Zoom regularly updates their software to fix bugs and roll out new features. CDLI strongly recommends that you regularly check to see if there are updates and then upgrade to the most recent version whenever a new version of Zoom is available.
Zoom Guides & Support
- Customize your profile
- Add/update your personal pronouns
- Best Practices for Securing Your Virtual Classroom (Zoom Blog)
- Create a Personal Meeting ID (e.g.: your own permanent virtual meeting space -- share this link with students to invite them to a meeting. The Personal Meeting ID works well as reusable link for office hours.)
- Scheduling a Meeting with Personal Meeting ID Your Personal Meeting ID creates a Meeting Room that is always accessible with the same Meeting ID and personal link, making it ideal for use with people you meet with regularly. It is should not be used for back-to-back meetings or people you do not meet with regularly.
- Joining a Meeting with Zoom (this is the same process students use to join a meeting that you have initiated)
- How Do I Share My Screen?
- How Do I Record a Meeting?
- Tip: Zoom can save recorded meetings to the cloud or to your computer. For local recordings you can then upload Zoom recordings to Canvas for streaming playback with students.
- How Do I Set Up Breakout Rooms in Advance?
- Note: Pre-assigned breakout rooms do not work reliably and are a known issue. You are welcome to attempt to use pre-assigned breakout rooms but CDLI is unable to support issues arising from their use.
- How Do I Share My iPad/iPhone in Zoom?
Using the Zoom Integration in Canvas
Tips and Tricks for Teaching with Zoom
Use Zoom Usage Reports to Take Attendance
Instead of wasting valuable time during your class session to take attendance, let Zoom take attendance for you!
There are a couple of different ways of accessing your Zoom meeting's usage report: 1) you can access the usage reports by logging into the SU Zoom Web Portal; or 2) you can access the usage report using the Zoom integration in Canvas.
From the SU Zoom Web Portal
After a Zoom meeting is over, log into the Seattle U Zoom Web Portal using your SU credentials.
In the navigation menu, click Reports. Then select Usage Reports.
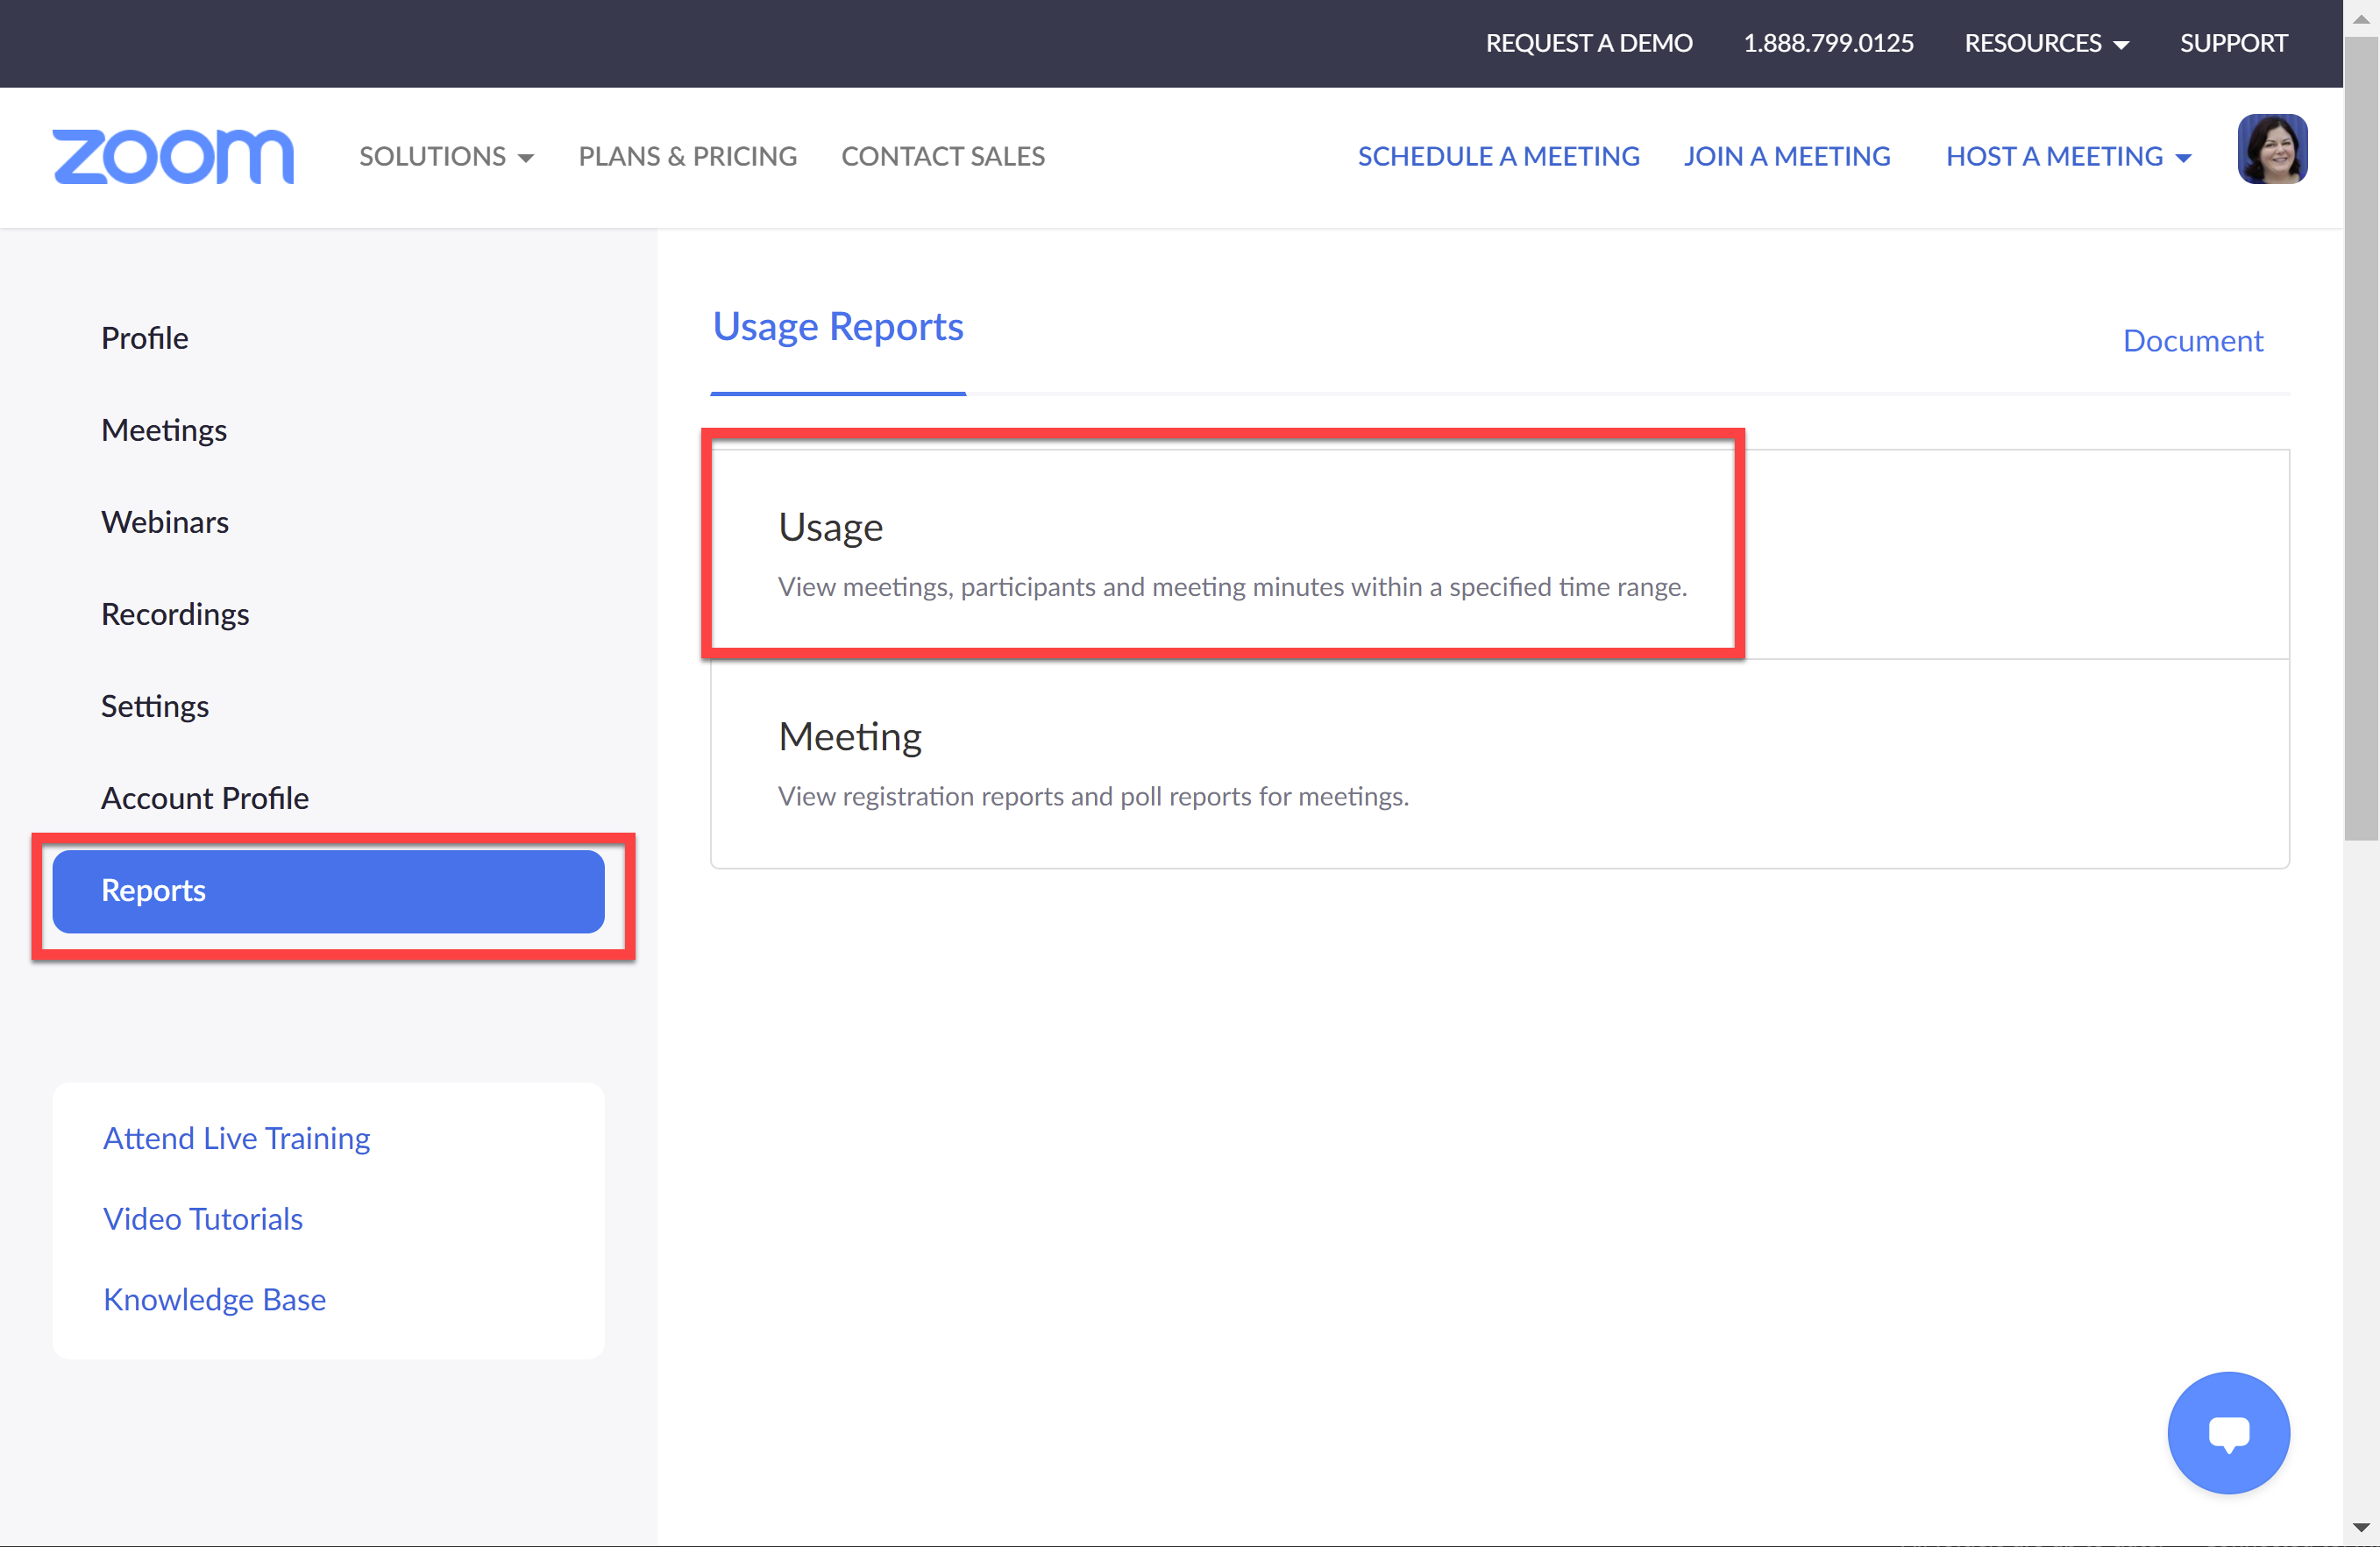
From there, you will see a list of the past Zoom meetings that you hosted (that ended more than 15 minutes ago).
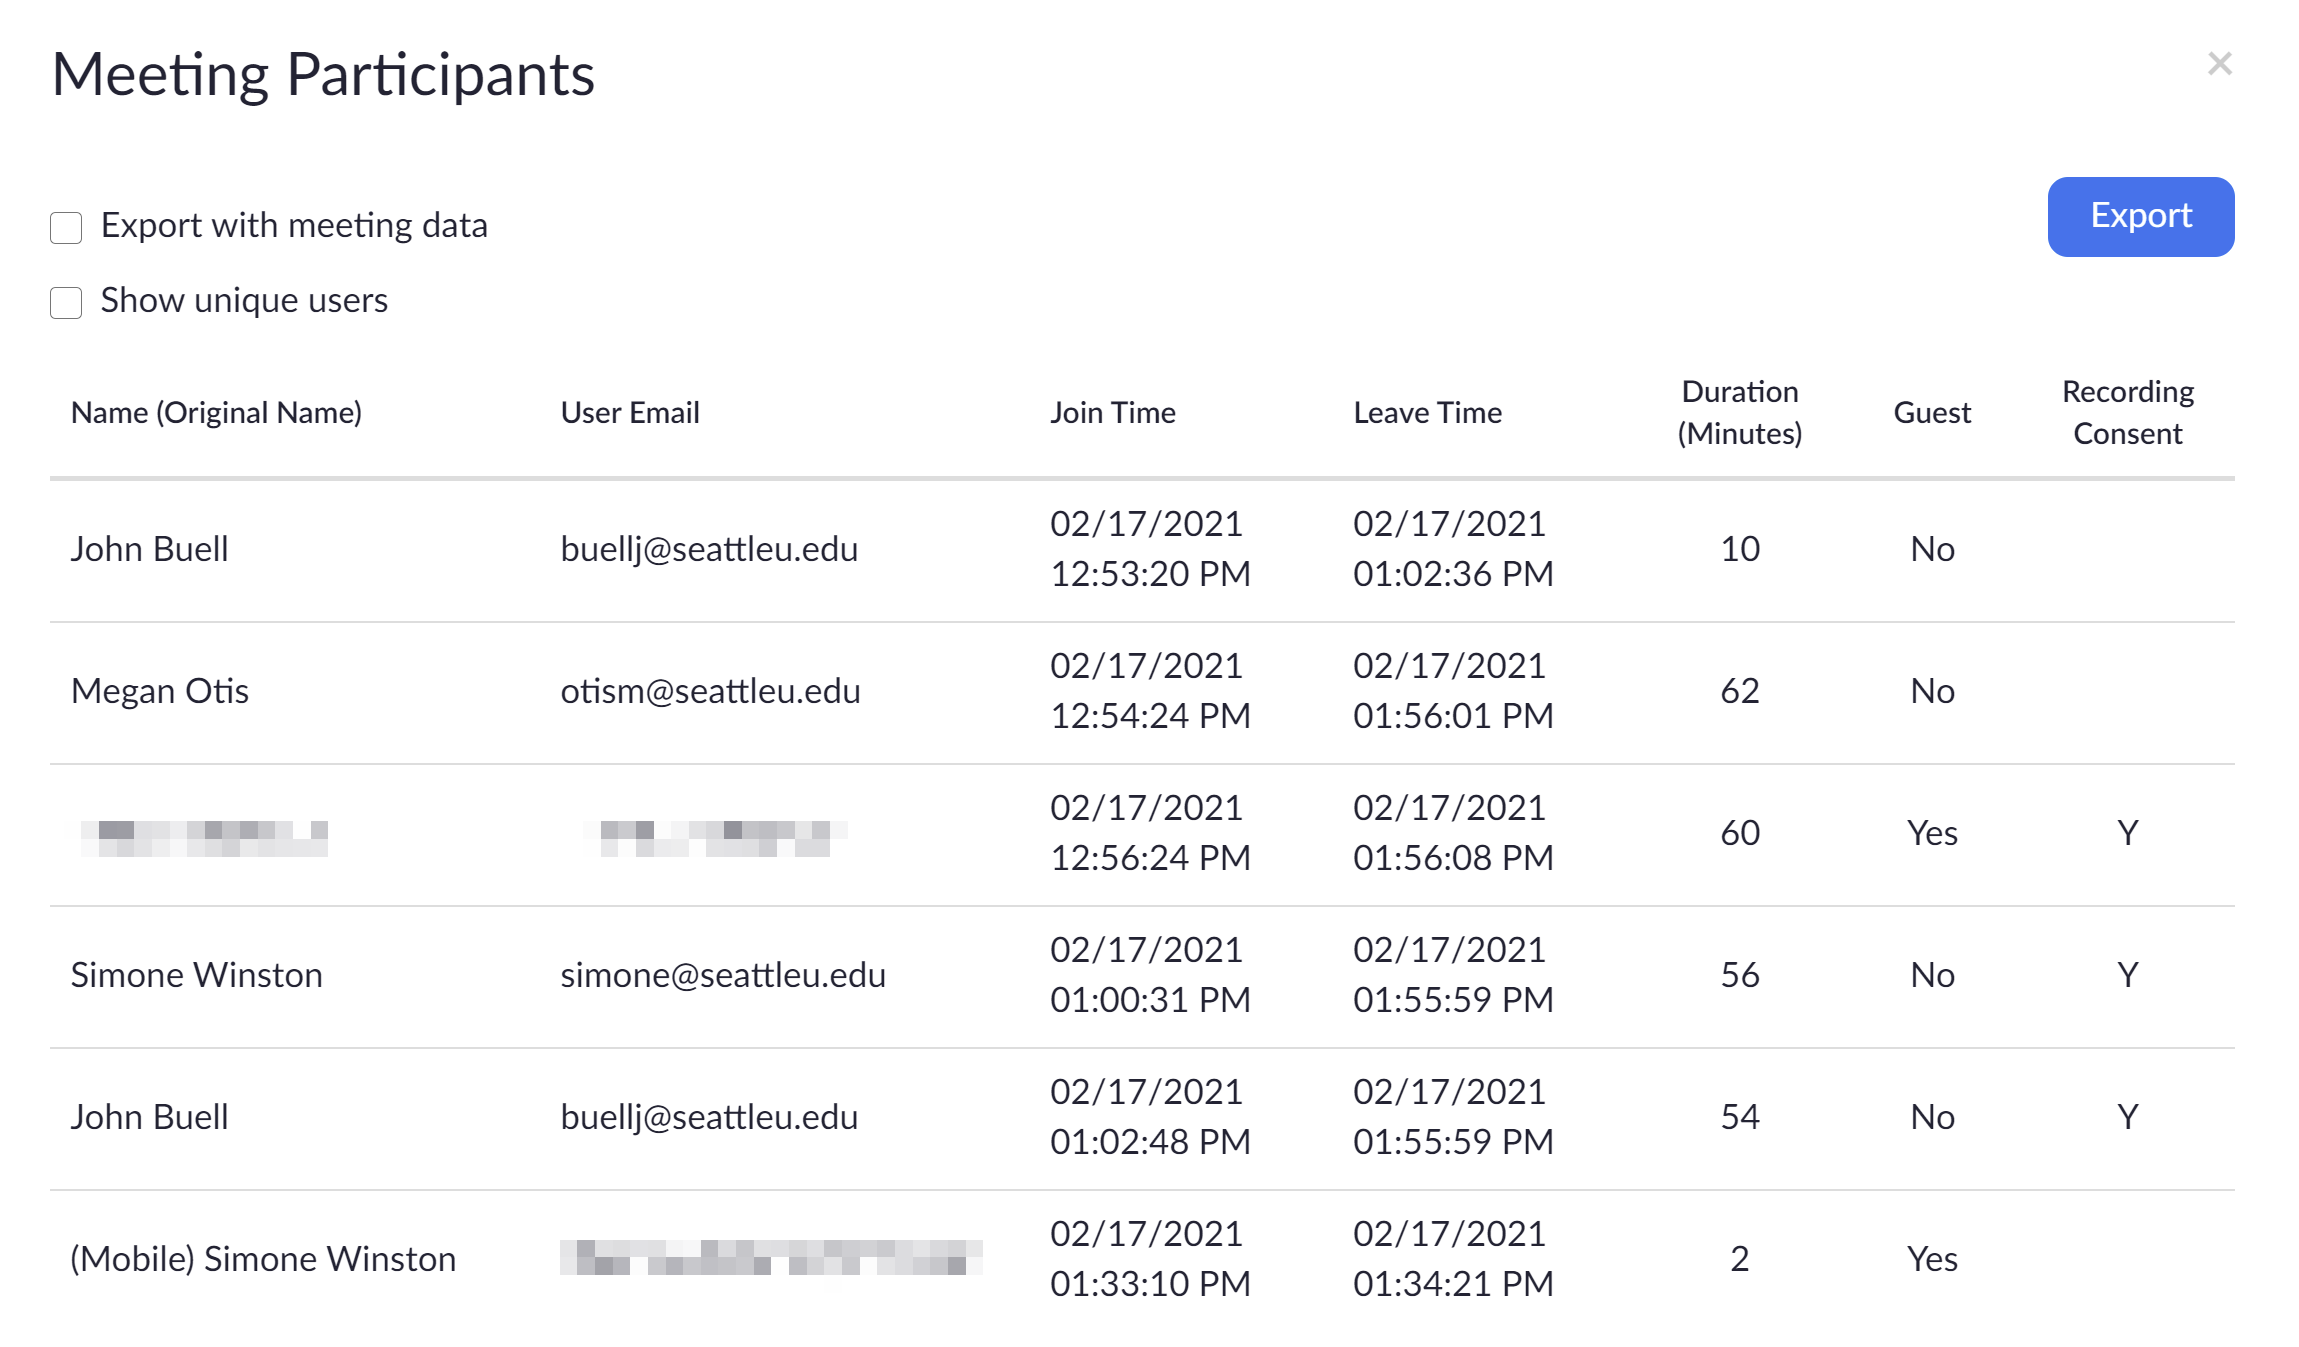
Locate the Zoom meeting for which you want to see attendance records, then in the Participants column towards the right hand side of the table, you will see that the total number of participants in the Zoom meeting is a link.

If you click the link, it will give you a pop up box listing details about all of the meeting participants including the names, emails, join time, leave time, duration in minutes, if the meeting participant is a guest or not, and if the session was recorded, whether or not the participant gave consent to be recorded.
You can also click the blue Export button near the top right hand corner of the pop up window to download your usage report as a CSV file (which can be opened in Excel or another spreadsheet program).
From the Zoom Integration in Canvas
If you are using the Zoom integration within Canvas, you can also access Zoom Usage Reports for each class meeting directly from Canvas.
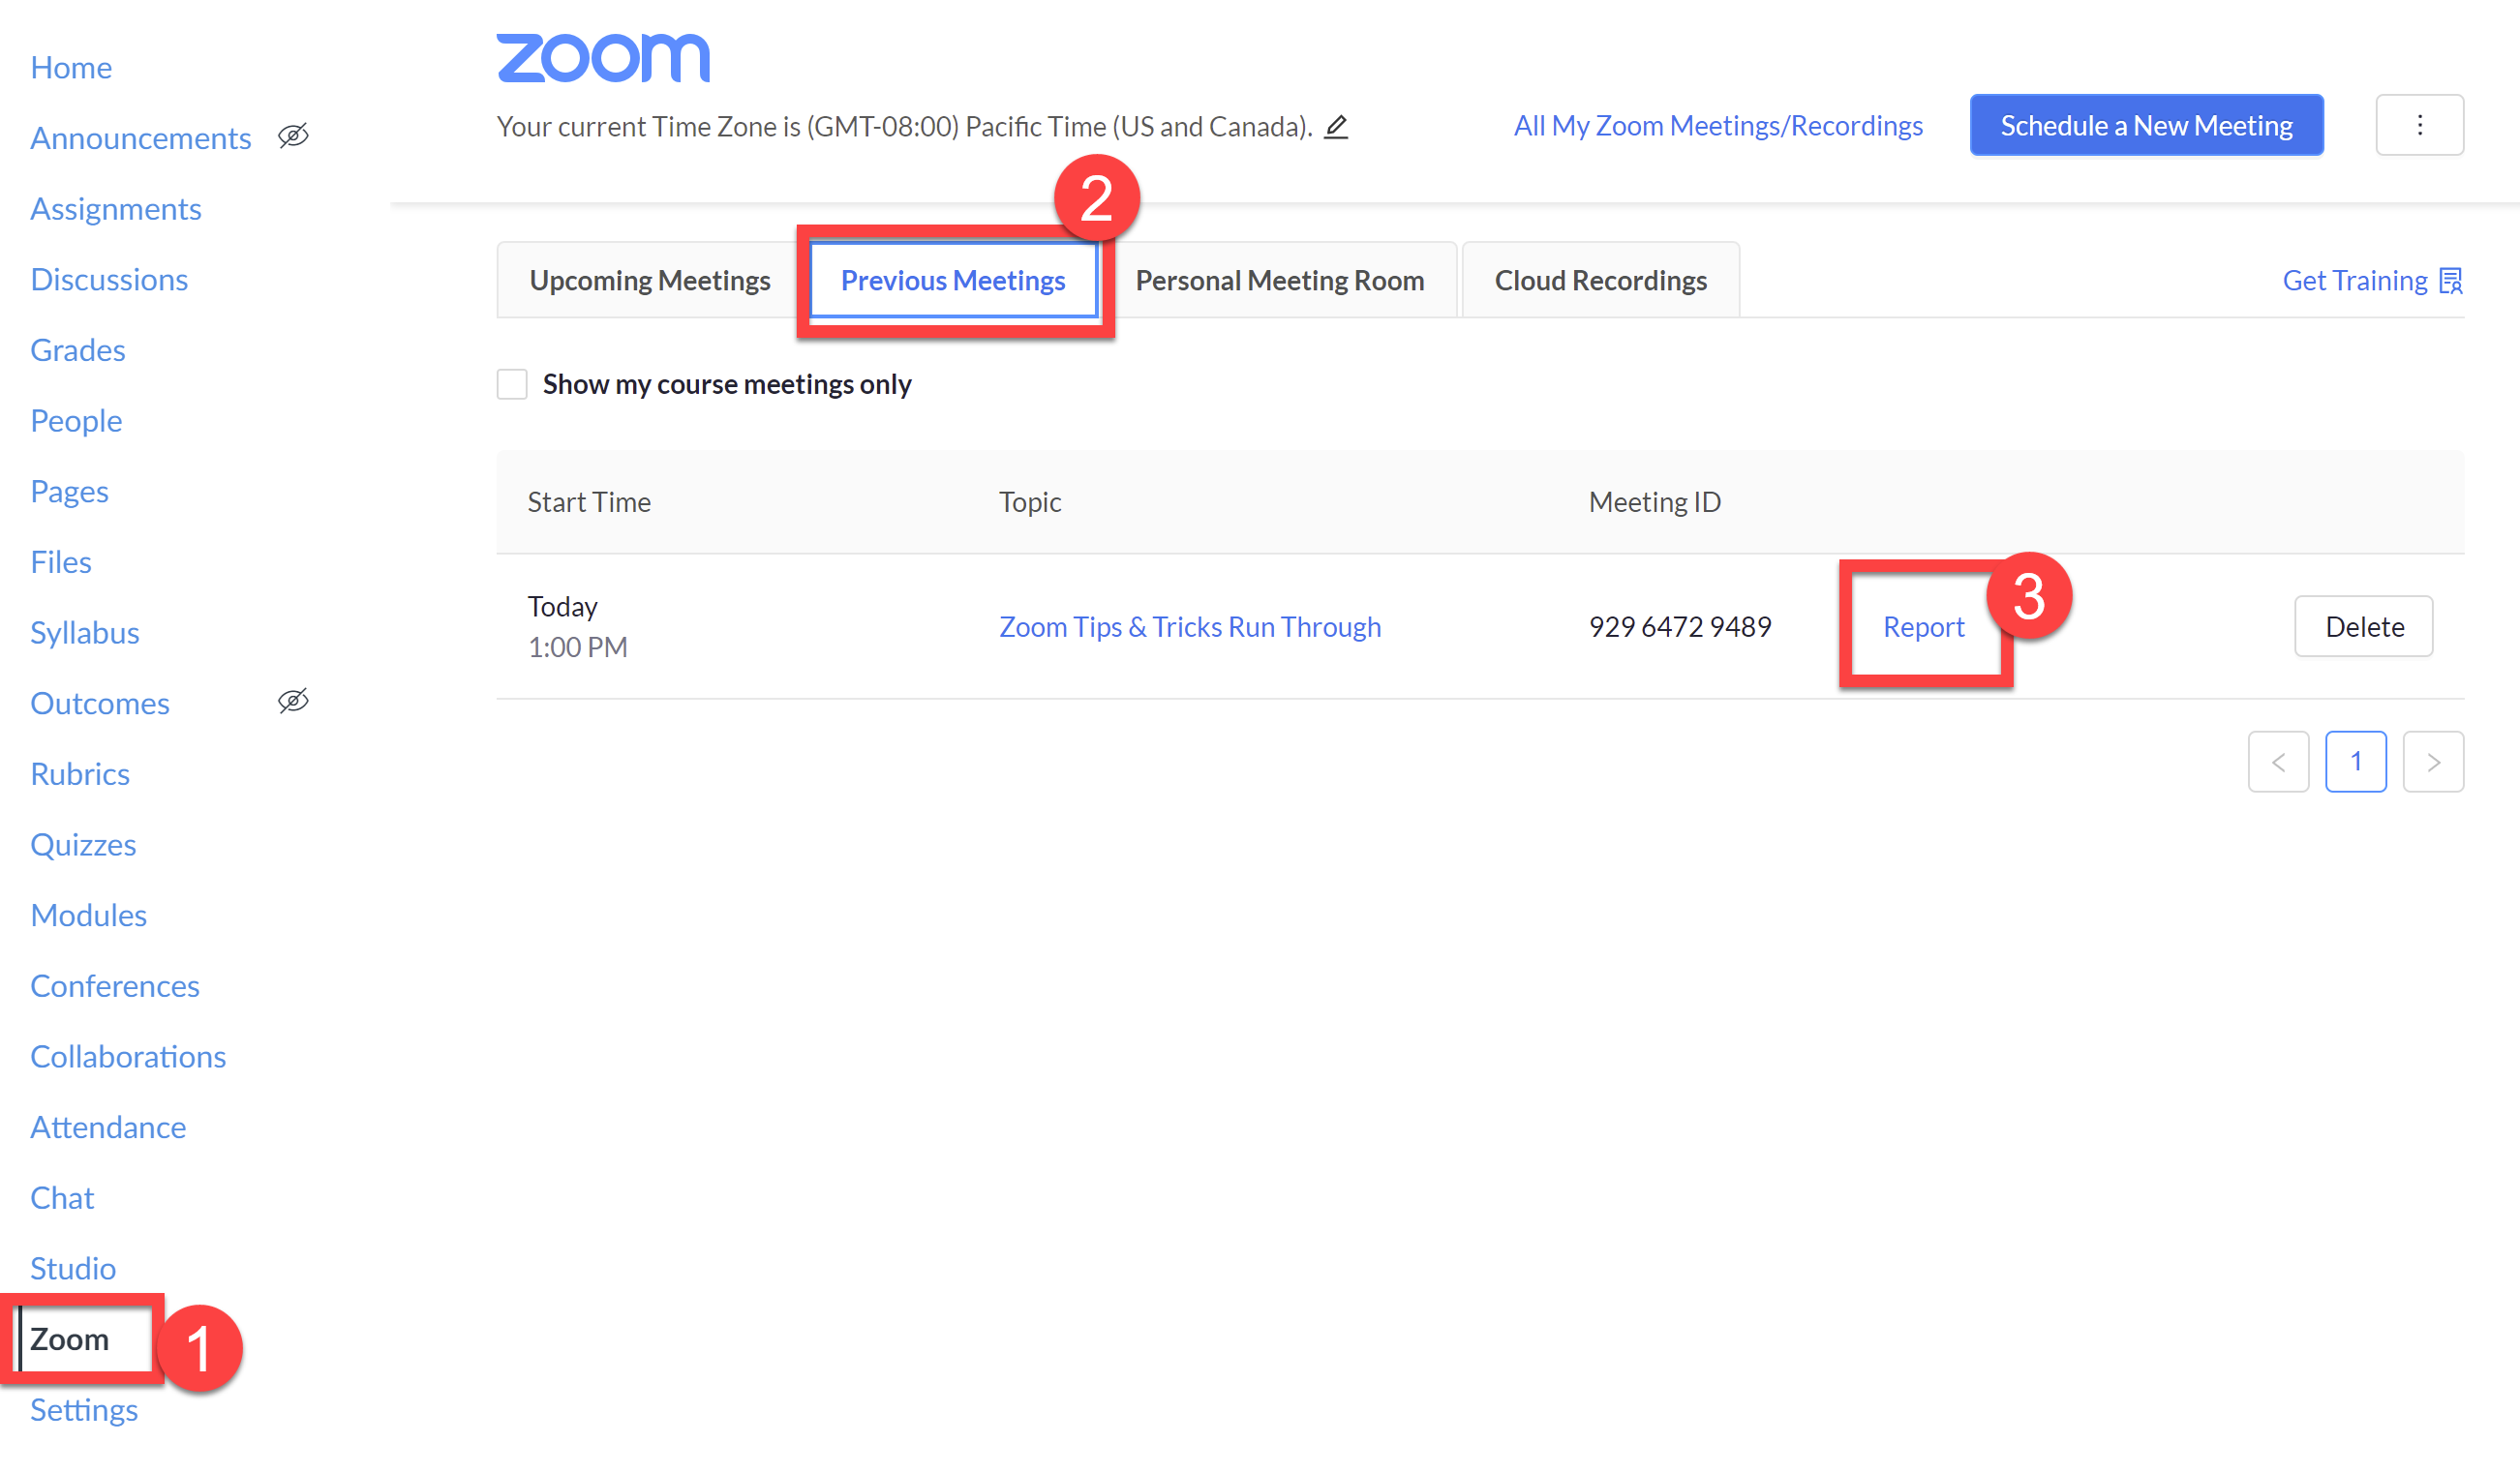
- In your Canvas course, first click the Zoom link in your course navigation menu.
- Then click over to the Previous Meetings tab. There you will see a list of your course's previously held Zoom meetings.
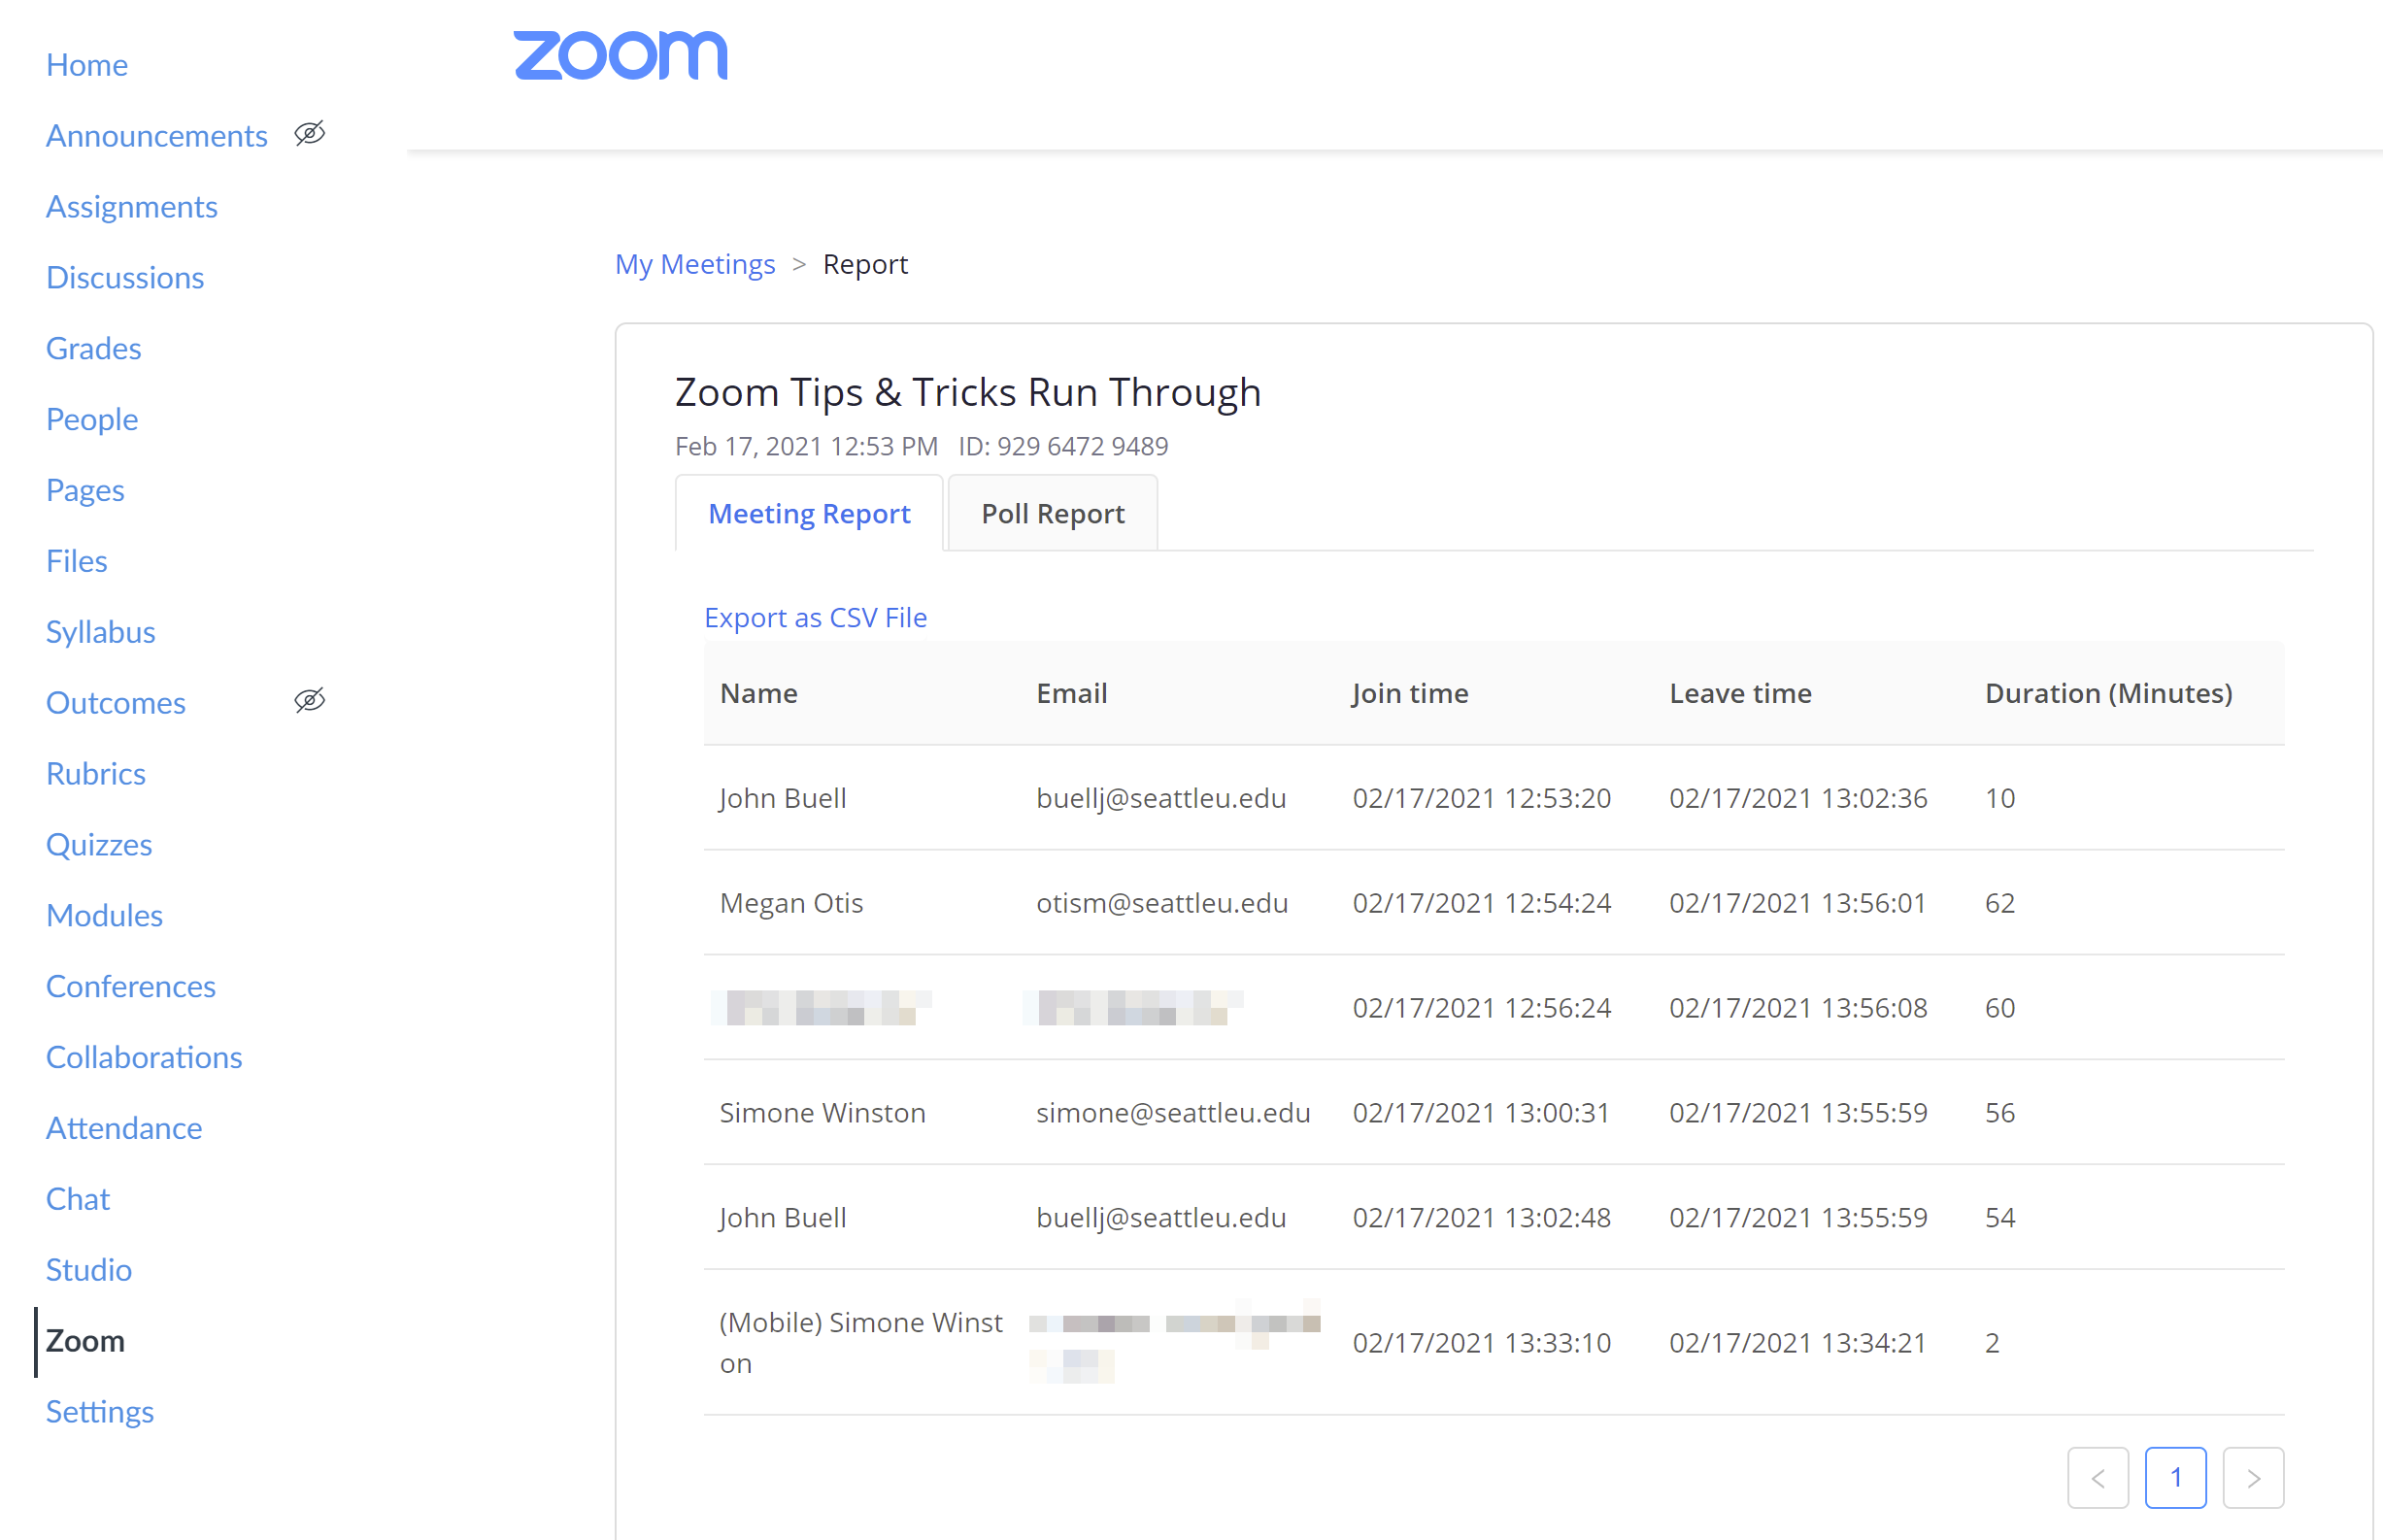
- Next to the meeting, click the link that says Report. It will show you all of the names, emails, join time, leave time, and duration for each meeting participant. You can also click the link to Export as CSV file.
Add Captions to Your Zoom Meetings
Adding captions to your Zoom meeting can be essential for meeting participants with disabilities, but captions can be very useful for everyone in many different circumstances.
As the meeting host, you can now enable live, auto-generated captions for your Zoom meetings. (Please note: individual meeting participants can turn the captions on or off if they do not wish to see the captions.)
After you have started the meeting, in your Zoom meeting controls, click the Show Captions button.
A pop up will open asking you to select from a drop down the language participants will use in this meeting. Select the language participants will be speaking (such as "English") and hit Save.
Once auto captioning has been enabled, you and your meeting participants have a few different options.
If you click the arrow next to the captions button, you can:
- Change the speaking language
- View Full Transcript
- Opens a side panel in Zoom, similar to Chat, which will show the transcript with time stamps. You can also search the transcript, or download the transcript from here.
- Change the Caption Settings (such as the font size and color)
- Opens your Zoom desktop client's settings on Accessibility. In addition to changing the caption font size and color, you can change the color of translations (if your meeting is being translated), always show captions, dim screen during share video when flashing images or visual patterns are detected that could potentially trigger seizures, change the chat size, enable/disable several different types of screen reader alerts.
Additionally, if you are the meeting host, you can disable the captions or set up a manual captioner.
Use Visual Enhancements to Alter Your Video or Background
There are several interesting and fun ways to enhance your video feed or your background while using the Zoom Desktop client.
If you click the arrow next to the video button in your meeting controls, you can:
- Blur your background
- Choose a virtual background
- Select one of several image or video backgrounds provided by Zoom, or you can upload your own image or video background.
- Seattle U MarCom also provides Zoom background options you can download and import into Zoom.
- Choose a video filter (similar to filters you find on Instagram or Snapchat, including Studio Effects, like makeup, mustache/beard or lipstick)
- Choose and show an Avatar
Troubleshooting Tips for Zoom Virtual Backgrounds
Zoom Virtual Backgrounds work best if you have a physical green screen behind you. But there are other adjustments you can make to increase the quality of your experience with Zoom Virtual Backgrounds.
- If you don't have a green screen, Zoom recommends using a solid color background.
- Don't wear the same color as your virtual background.
- Better lighting in your space can help Zoom distinguish between you and your background.
- The better quality your webcam, the better your Zoom virtual background experience.
- Match the aspect ratio of your background image to the aspect ratio your webcam (such as 4:3 or 16:9 for widescreen).
- For image backgrounds, Zoom recommends a minimum resolution of 1280 x 720 pixels.
- For video backgrounds, Zoom recommends a minimum resolution of 480 x 360 pixels (360p) and maximum resolution of 1920 x 1080 pixels (1080p).
Use a Powerpoint as your Virtual Background
This option allows your participants to view your video imposed directly on the PowerPoint screen share. You can move between slides directly from within the meeting controls.
The prerequisite is all the participants in your meeting will need the Zoom client application version 5.2.0 or higher on macOS, Windows, iOS, Android, or Linux. If participants are in an older version, they will see the presentation and video separately like a normal screen share.
To launch this option in your meeting:
- Click the Share Screen button in the Zoom client meeting controls.
- At the top of the Select a window or an application that you want to share screen, click Advanced.
- Click PowerPoint as Virtual Background.
- Click the Share button.
- Locate the PowerPoint presentation you want to share, select, and open.

Manage Your Presentation
- Start your video to show your video over the presentation slides. In the meeting controls, click the Start Video button.
- Use the > or < buttons in the presentation controls (above the meeting controls) to advance or return to the previous slides.

- To resize your video, click on the three dots […] in the presentation controls and select Resize My Video in the pop-up menu or click on your video. This will display a frame around your video. Click and hold on one of the four corners of your video and drag the corner to make your video larger or smaller. To reposition your video, click and hold on the center of your video and drag it to a new position.
- To separate your video from the slides, click on […] in the presentation controls and select Split Video from Slides. Your presentation will continue as a normal screen share, and your video will be in a separate box, as normal.
- To merge your video back with the presentation slides, click on […] in the presentation controls and select Merge Video and Slides. Your presentation will continue, once again as a virtual background behind your video.
Note: Sound, transitions, or animations embedded in PowerPoint are not supported when using your presentation as a virtual background.
Recordings
If the Presenter records the meeting locally, the recording will have the video embedded on top of the slides. If the host or another participant records the meeting locally, they must be on Zoom version at least 5.2.0 or higher for the video to be embedded on the slides. If they are on any version older than 5.2.0 or record to the cloud, the recording will record the slides and video as a normal screen share recording.
“Trim” Your Zoom Cloud Recordings
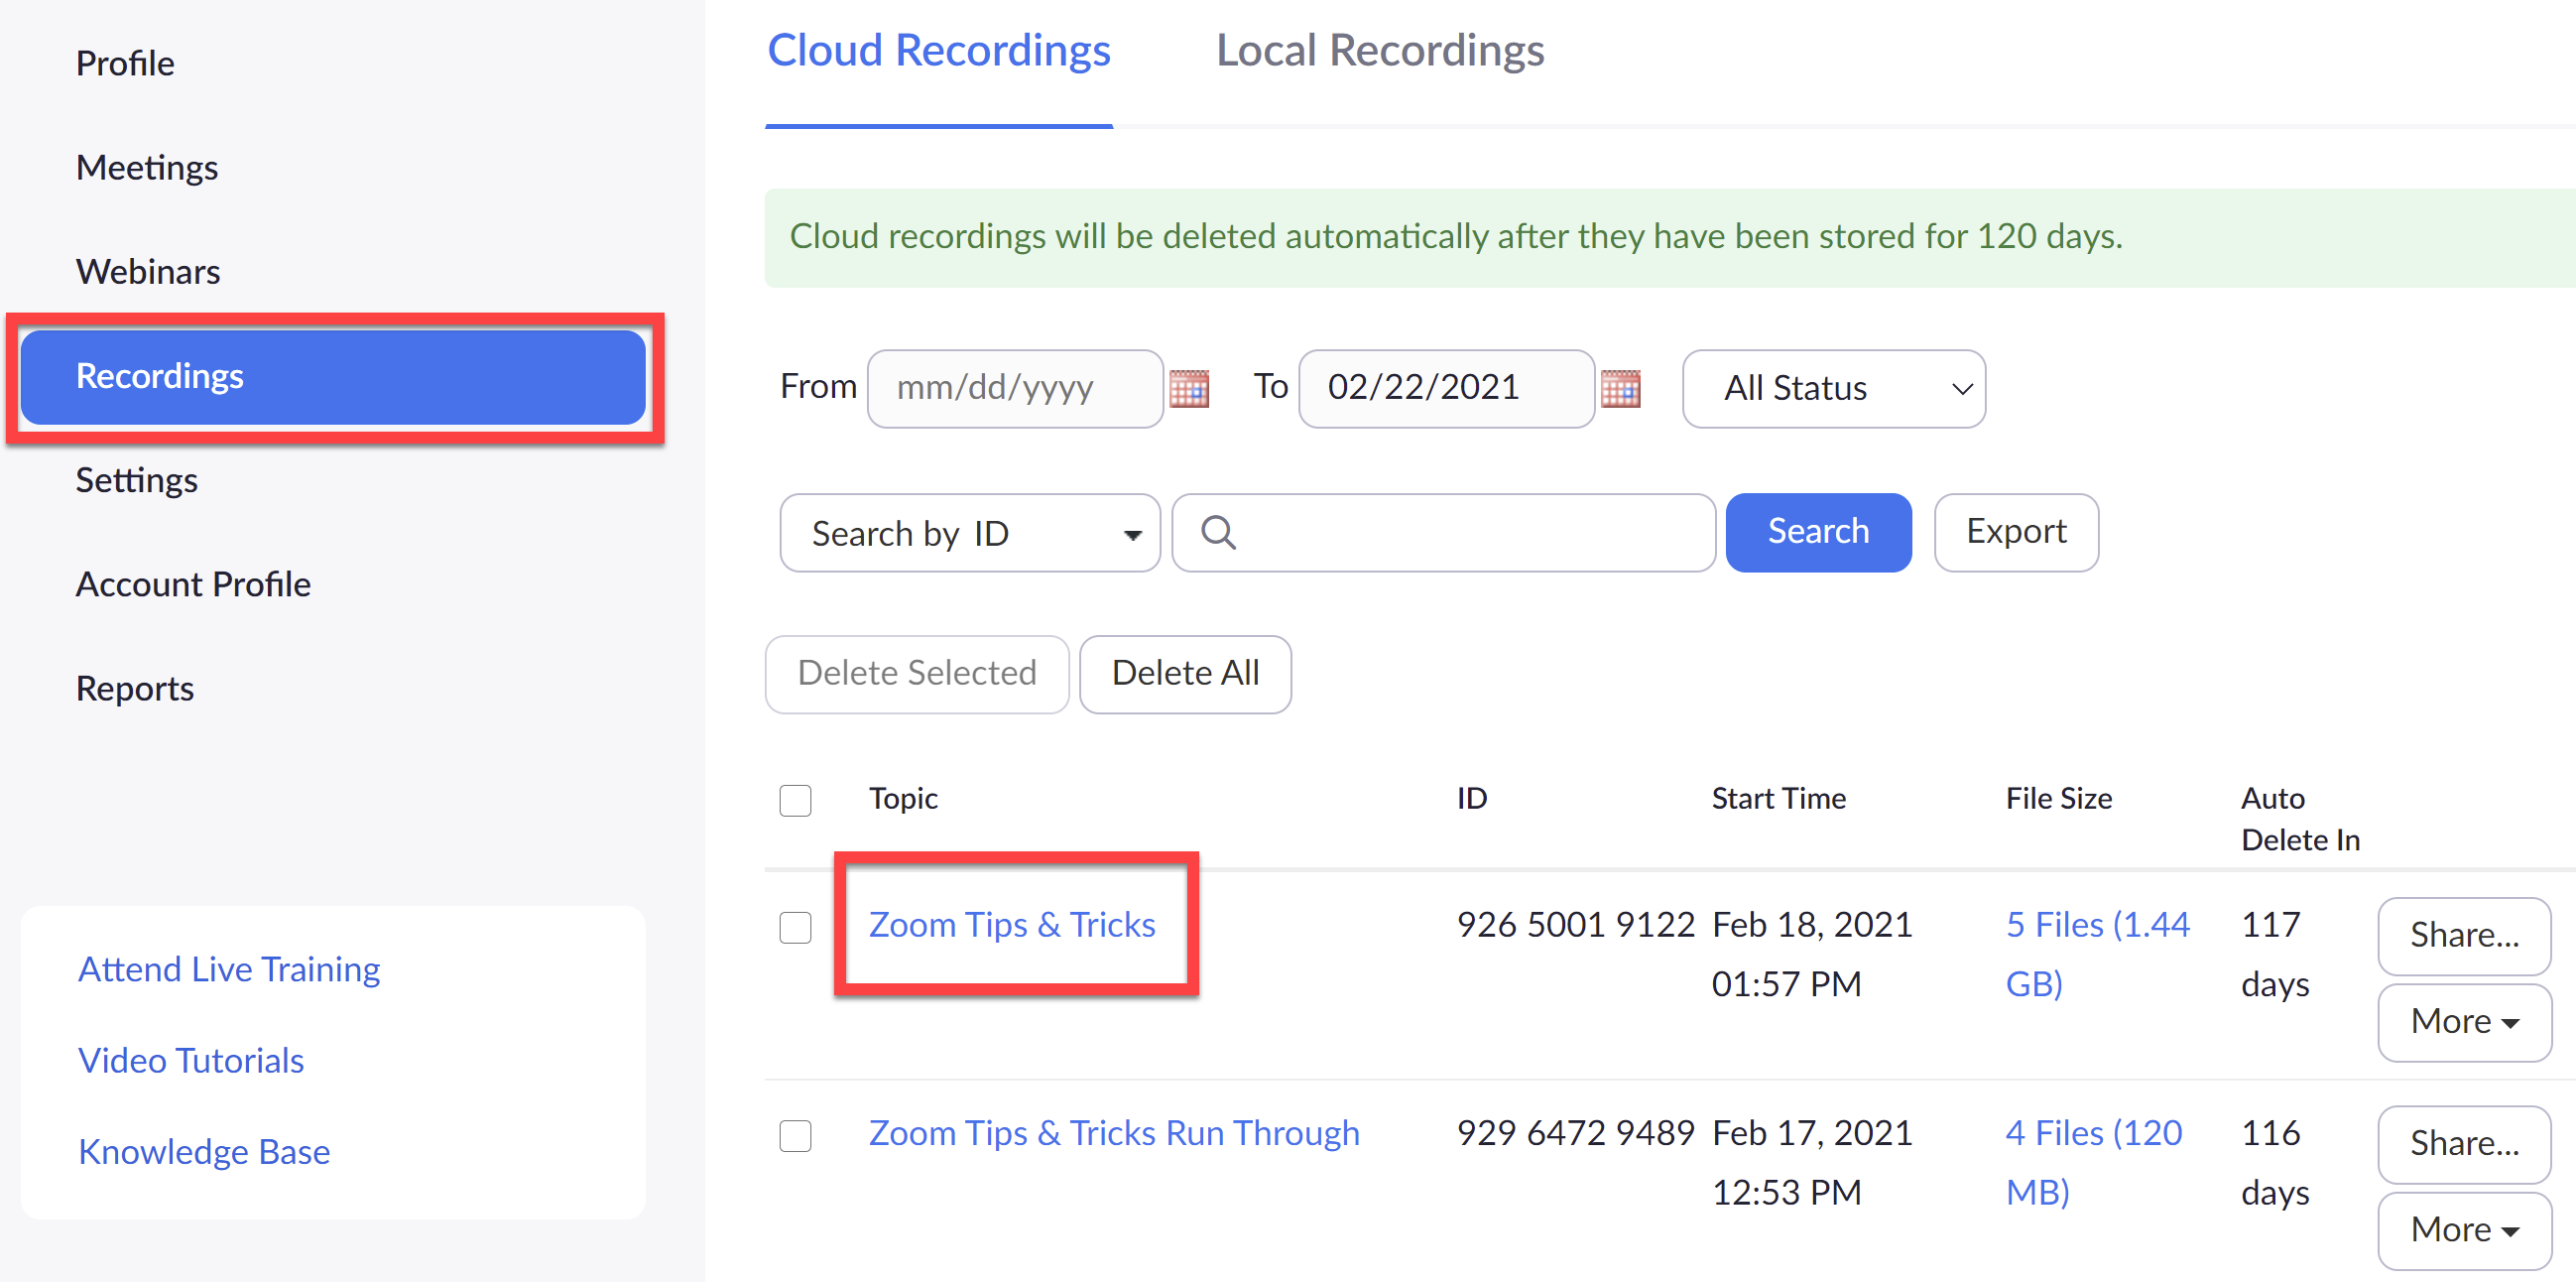
If you set your class Zoom sessions to be automatically recorded to the Cloud, but you wish to trim off part of the recording from the beginning or end of the recording, you can do this by signing in with your SU credentials to the SU Zoom Web Portal.
Then click Recordings in the navigation menu. Then scroll through your list of recordings to locate the recording you wish to edit, then under the Topic column, click the name of the meeting.
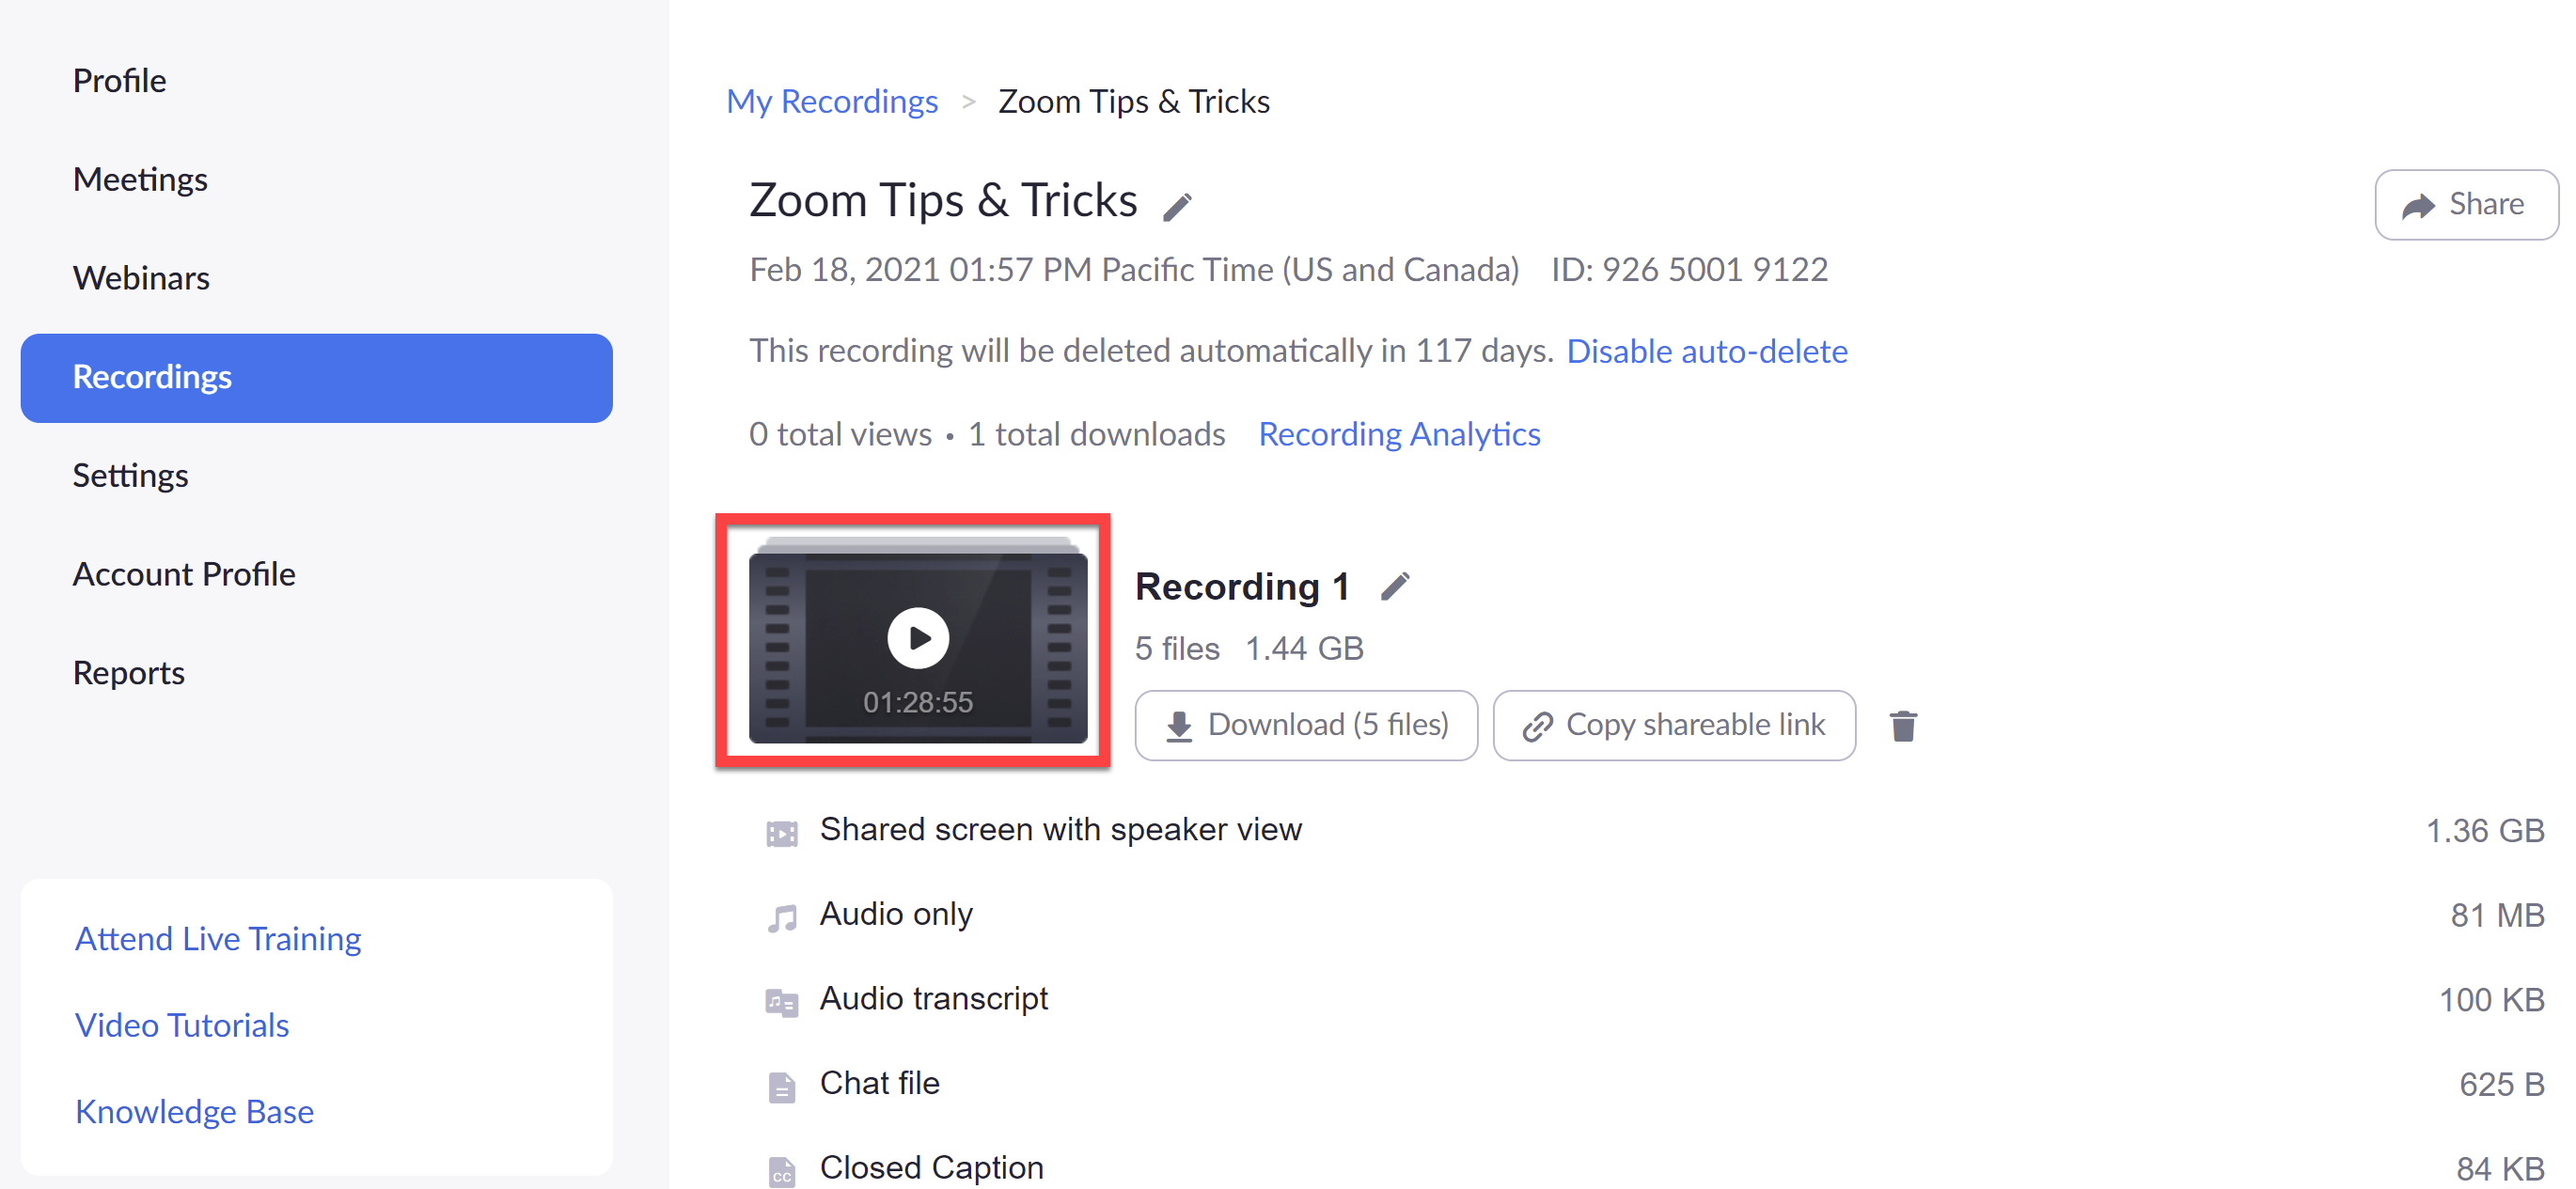
Next, click the thumbnail image of the recording.
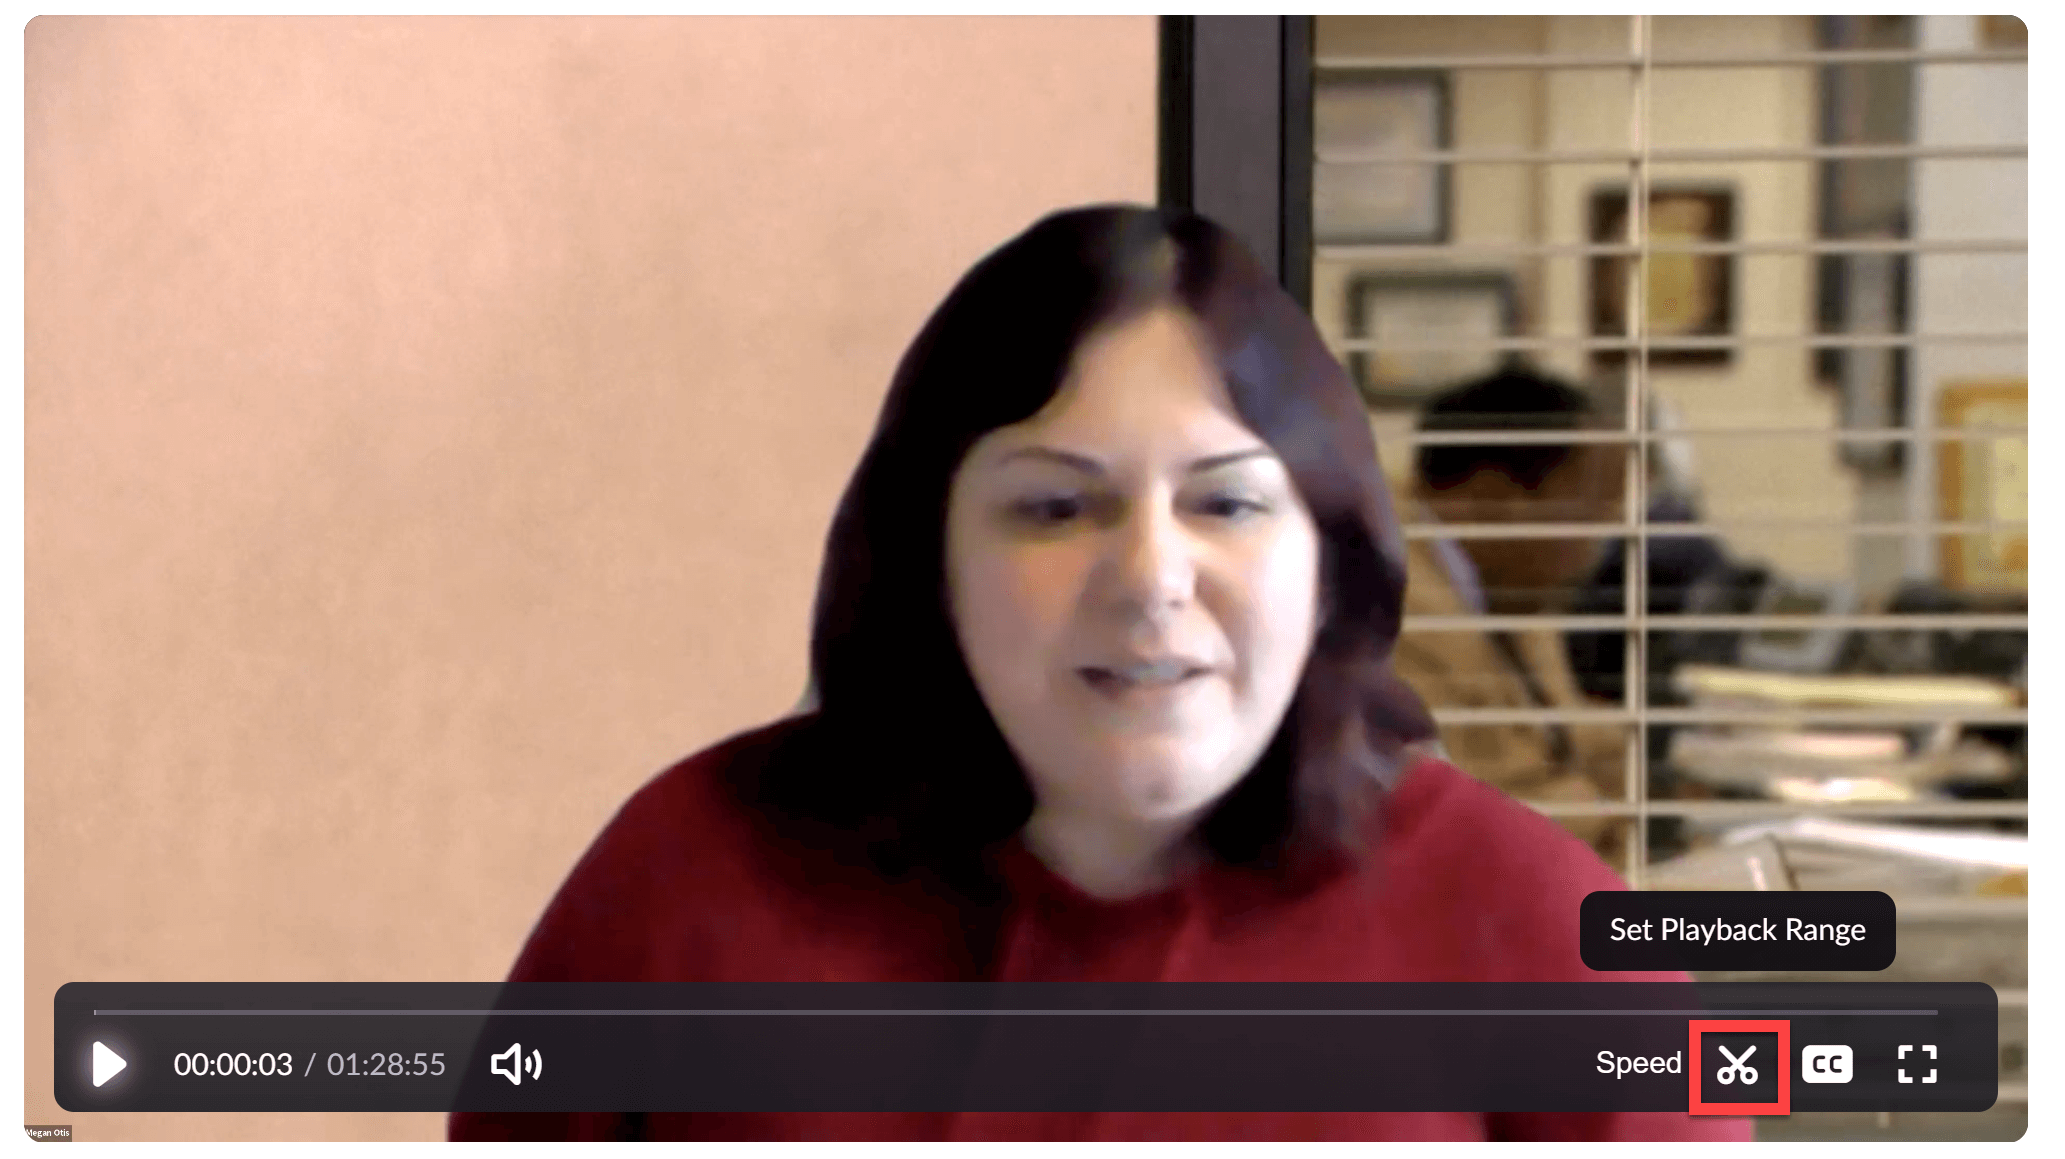
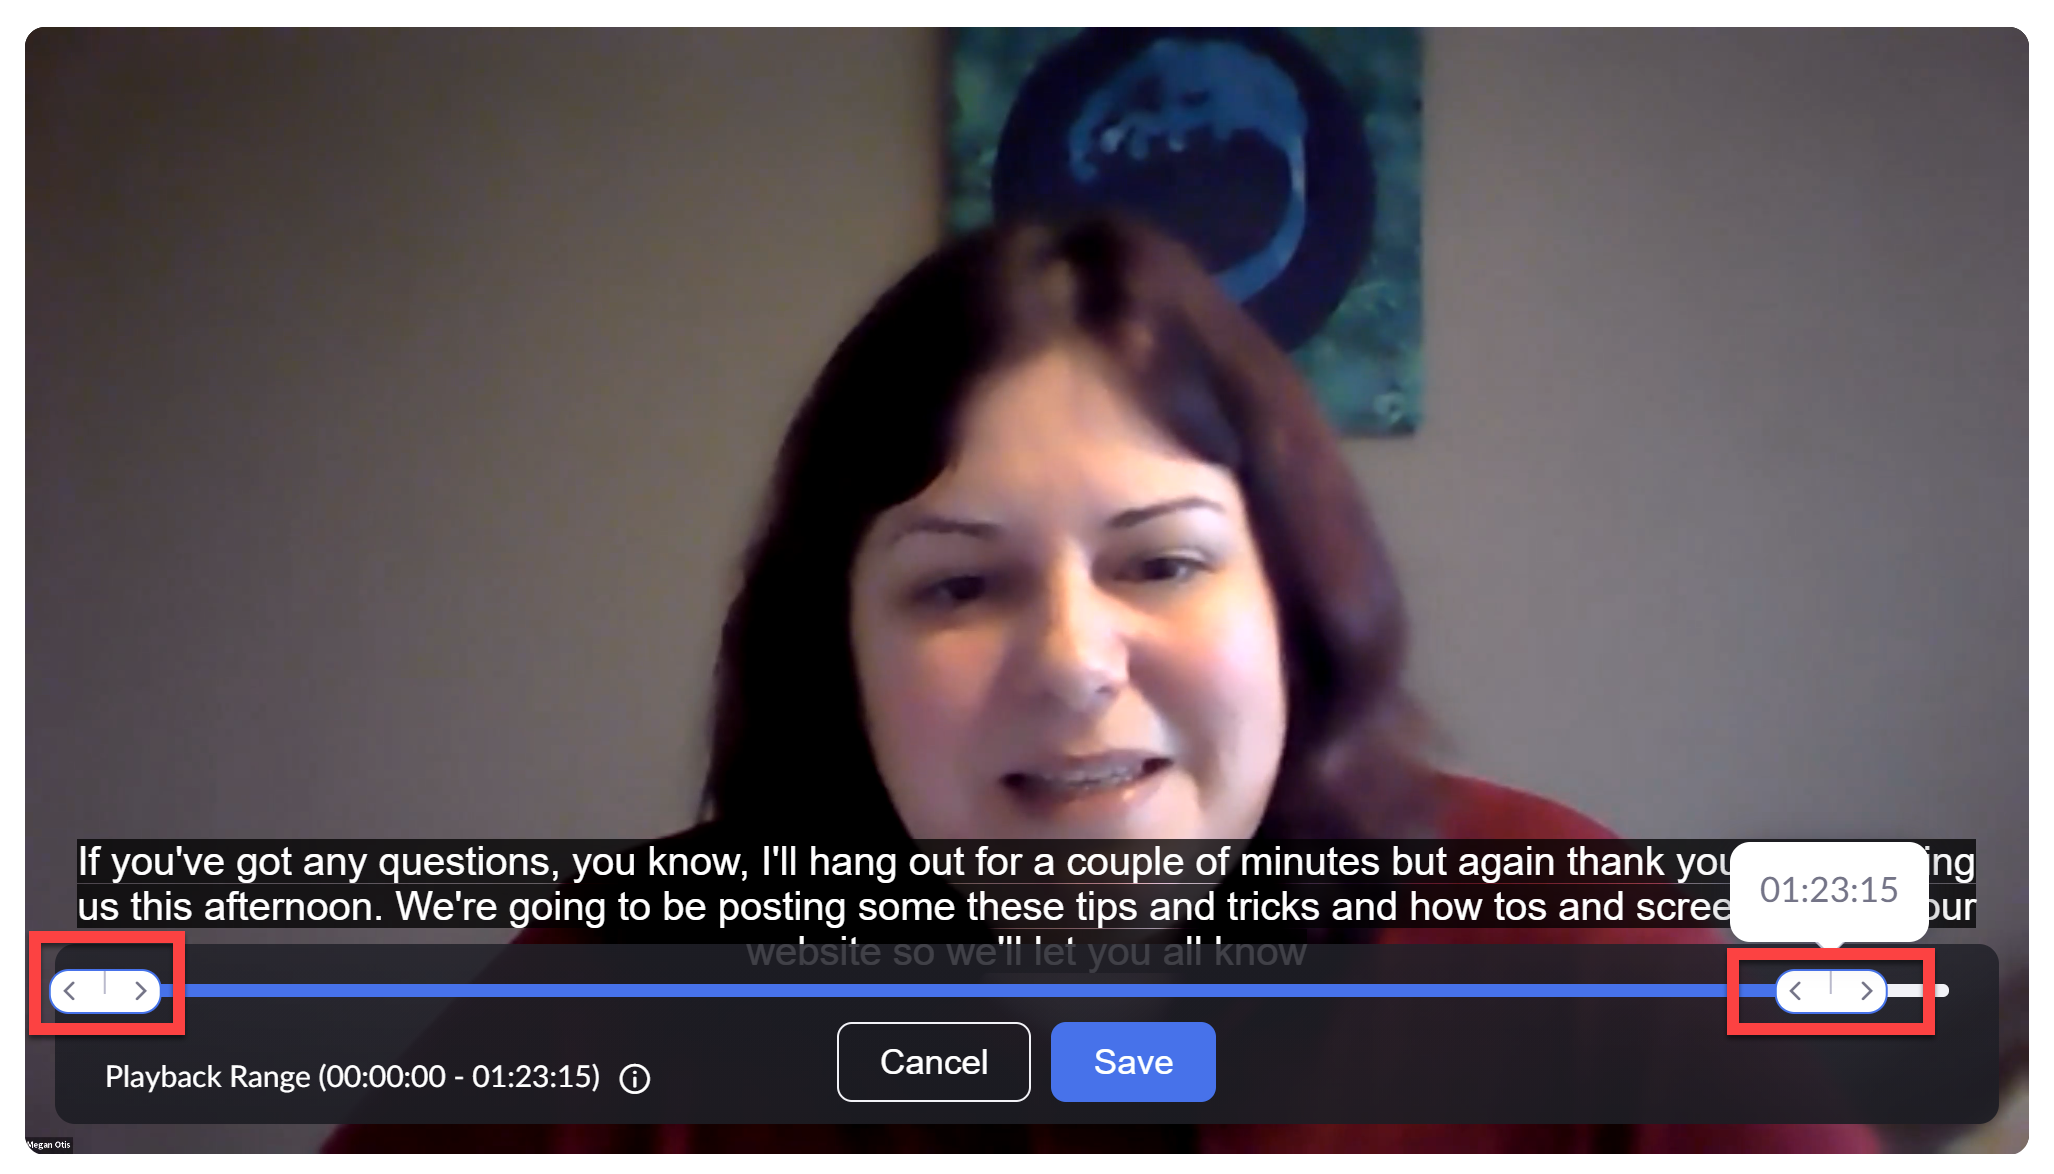
Next, in the video controls, select the Scissors icon to Set Custom Playback Range. (You may need to hover your mouse over the video to get the video controls to appear.)
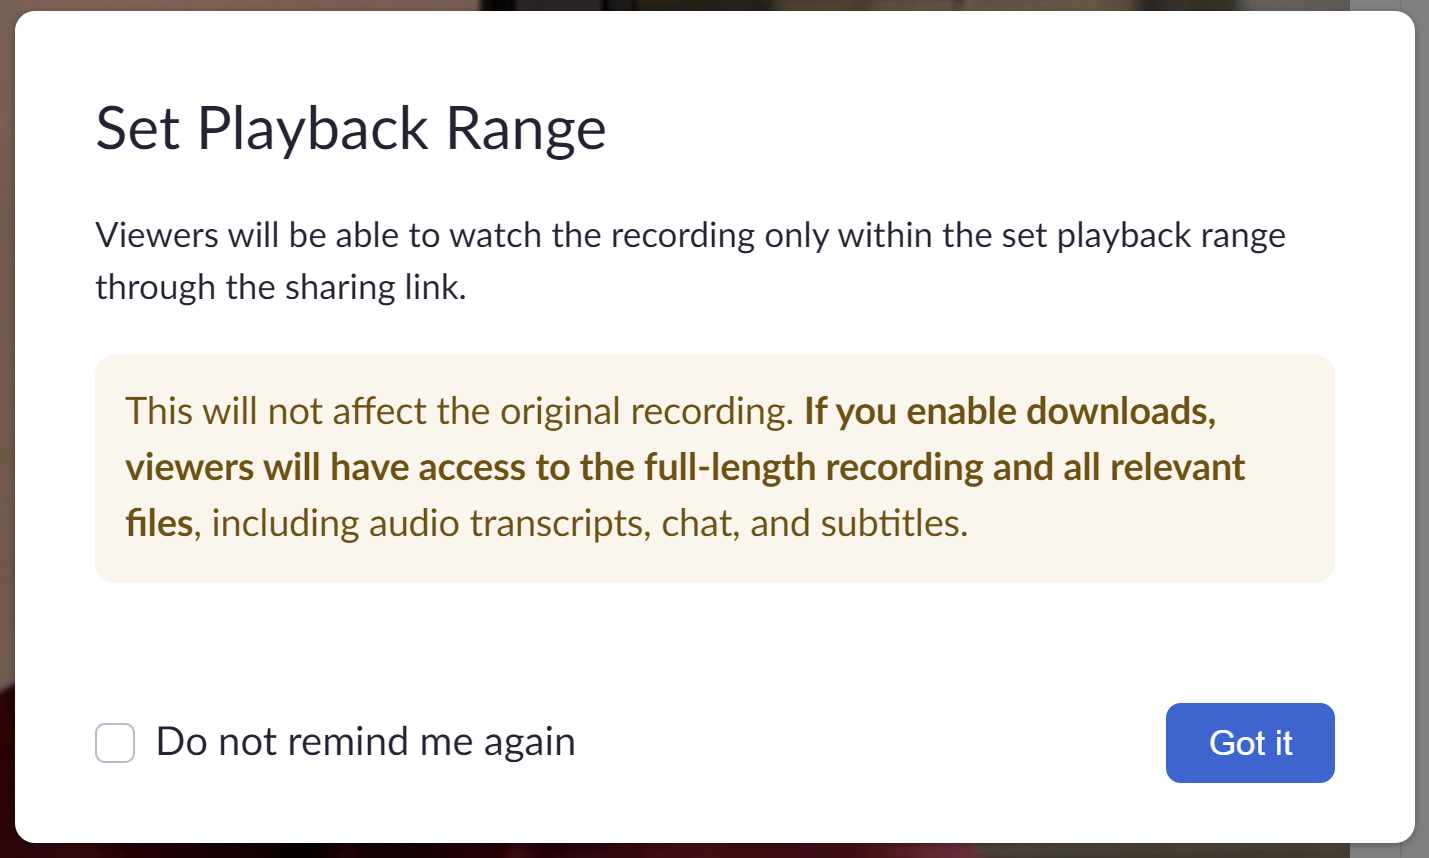
When you click this button, first you will get a pop up box warning you that the "trimmed" version is only available to your students through the playback link. If you have the "enable downloads" option on, then students will download the unedited, full-length video file. If you do not wish students to be able to download the unedited file (such as due to potential FERPA issues), you must turn off the "enable downloads" option (see below for instructions).
There will be two sets of sliders on the video timeline (one at the beginning and one at the ending). Click and drag the sliders to select new beginning and/or new end for the recording. Then hit Save.
Disabling Downloads
"Trimming" your Zoom Cloud Recordings only impacts the version of the recording students will see when using the video's share link (this is the version that students have access to through the Canvas Zoom interface).
If the "download" option is enabled, your students will be able to download the unedited, full-length video files.
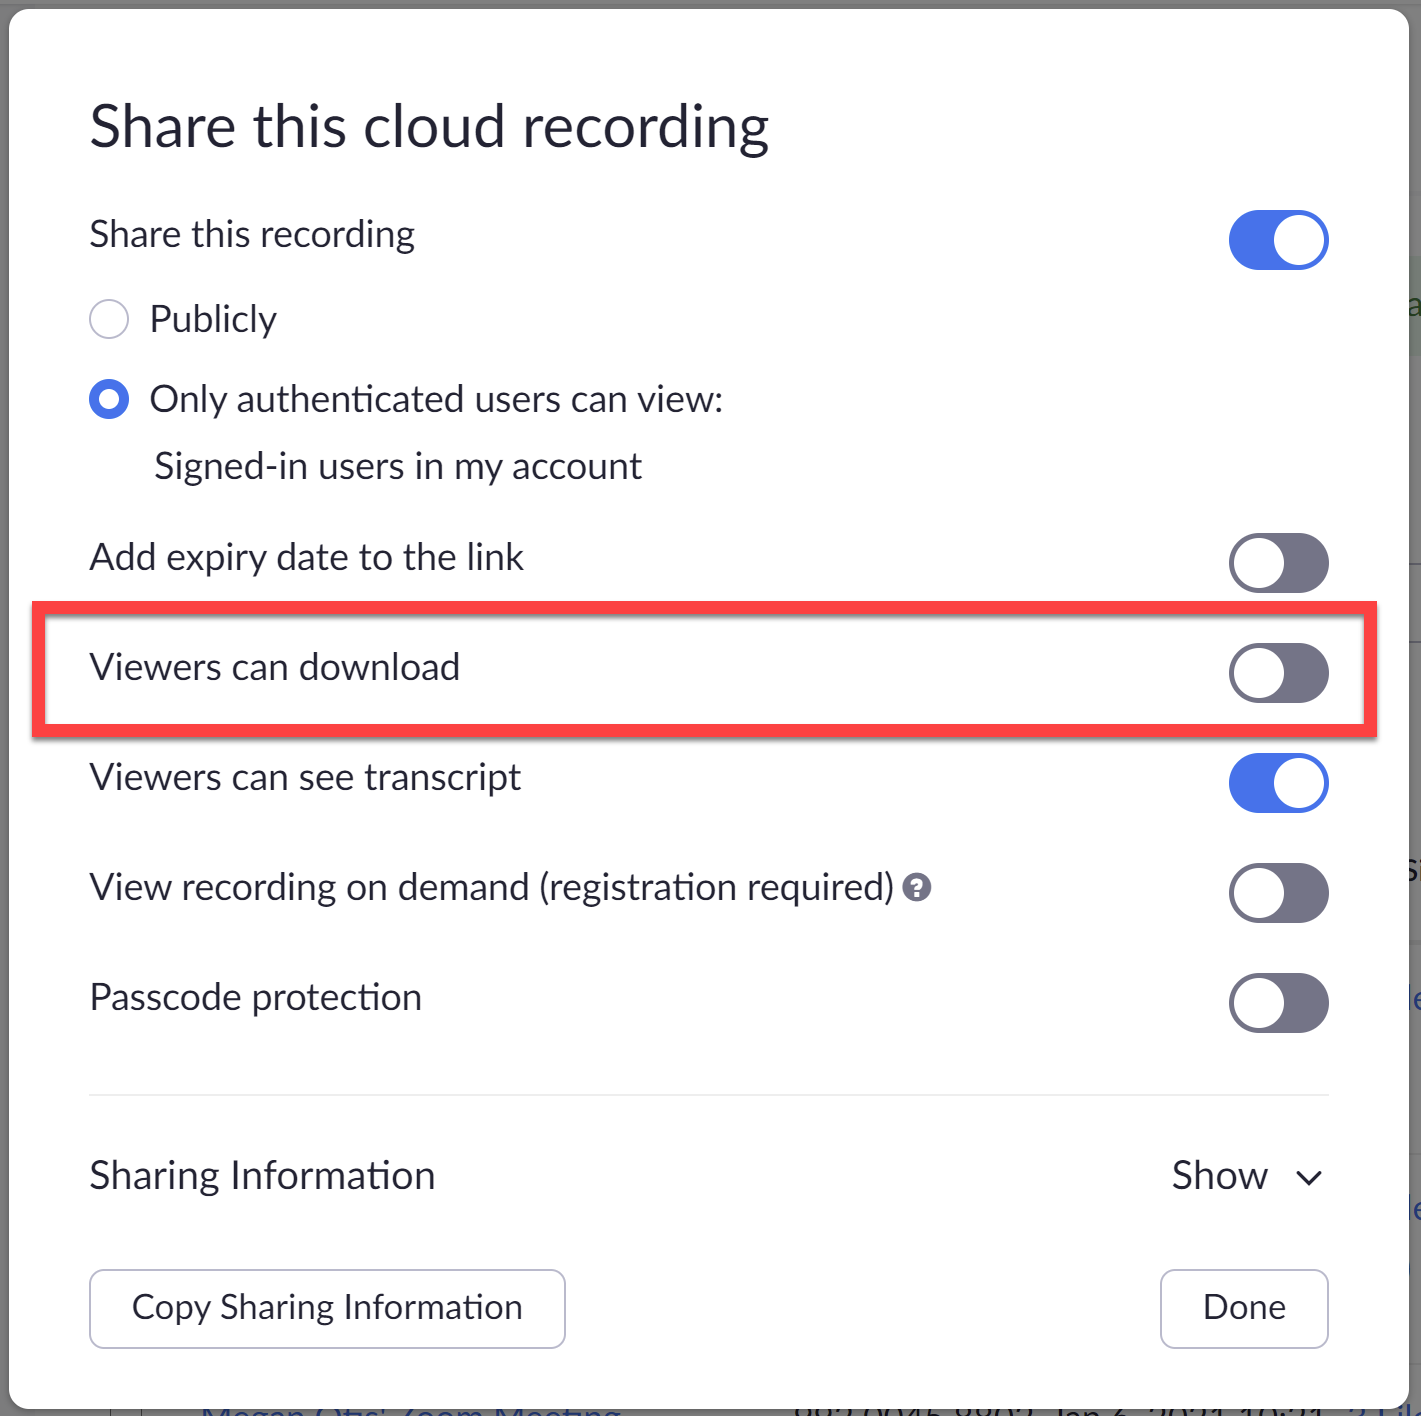
If you do not wish students to be able to download the unedited recording (for example, if you forget to stop recording after class when you have a private conversation with a student about their grade, and it would be a FERPA violation for your students to have access to a recording of that conversation) then go into the Seattle U Zoom Web Portal, select Recordings from the navigation menu on the left, and then next to your Zoom recording, click the Share button.
A pop up will open which will allow you to change your recording's Share settings. Next to "Viewers can download" make sure the switch is flipped off (grey), then hit Done.
Use Reactions to Get Quick Non-Verbal Feedback
Reactions are a useful tool within Zoom for participants to share non-verbal feedback without interrupting the presentation. These emojis and non-verbal reactions are now found when you click the Reactions button in your Zoom meeting controls.

Emoji reactions are on the top row, non-verbal feedback (Yes, No, Slower, and Faster) the middle row and the Raise Hand button on the bottom.
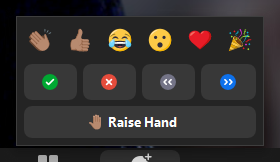
Emoji reactions disappear from the participant’s video after 5 seconds. Raise hand and non-verbal feedback will be remain and must be manually removed by the participant or host.
Please note: Meeting hosts can disable emoji and non-verbal feedback options in their meeting settings. However, the Raise Hand option cannot be disabled.
The Participants panel keeps a running total of reactions and non-verbal feedback. This quick tally is useful for gathering informal feedback from your students during a Zoom session:

Use Dual Monitors to see Shared Screen and Gallery Simultaneously
If you have access to another display monitor, enabling the Dual Monitors option in your desktop client settings will allow you to display your presentation on one screen and see your participants on the other screen.
Visit the Zoom Help Center article for system prerequisites for dual monitors.
To enable dual monitors:
- Launch and sign-in to the Zoom Client on your desktop.
- Click your profile picture then select Settings.
- Click General
- Check to enable Use dual monitors:
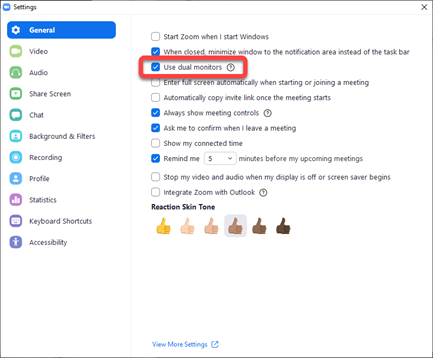
- Exit and Restart the Zoom client to apply your dual monitors setting.
- Start your meeting, you will now see two Zoom windows one with the Zoom controls on your main screen and one without on your second screen.
When you begin the Share Screen function, your shared screen will display in the window with the Zoom controls, the participants will be in the window without the Zoom controls. If you do not share screen and you do not have a participant video pinned in the meeting, the window without the Zoom controls will default to Active Speaker display, you can change to Gallery View if you wish.
Use Annotations to Draw on Shared Screen or Whiteboard
Meeting participants can use Zoom's Annotations tool to draw or write on a Shared Screen or Zoom Whiteboard. This can be useful to draw your students' attention to something specific on the screen or help students analyze what they're seeing on screen.
In order to use Zoom's Annotations tool, first make sure that you have enabled Annotations in your Zoom settings. Sign in to the Seattle U Zoom Web Portal, select Settings from the navigation menu on the left, and then under In Meeting (Basic) scroll down until you find Annotations.
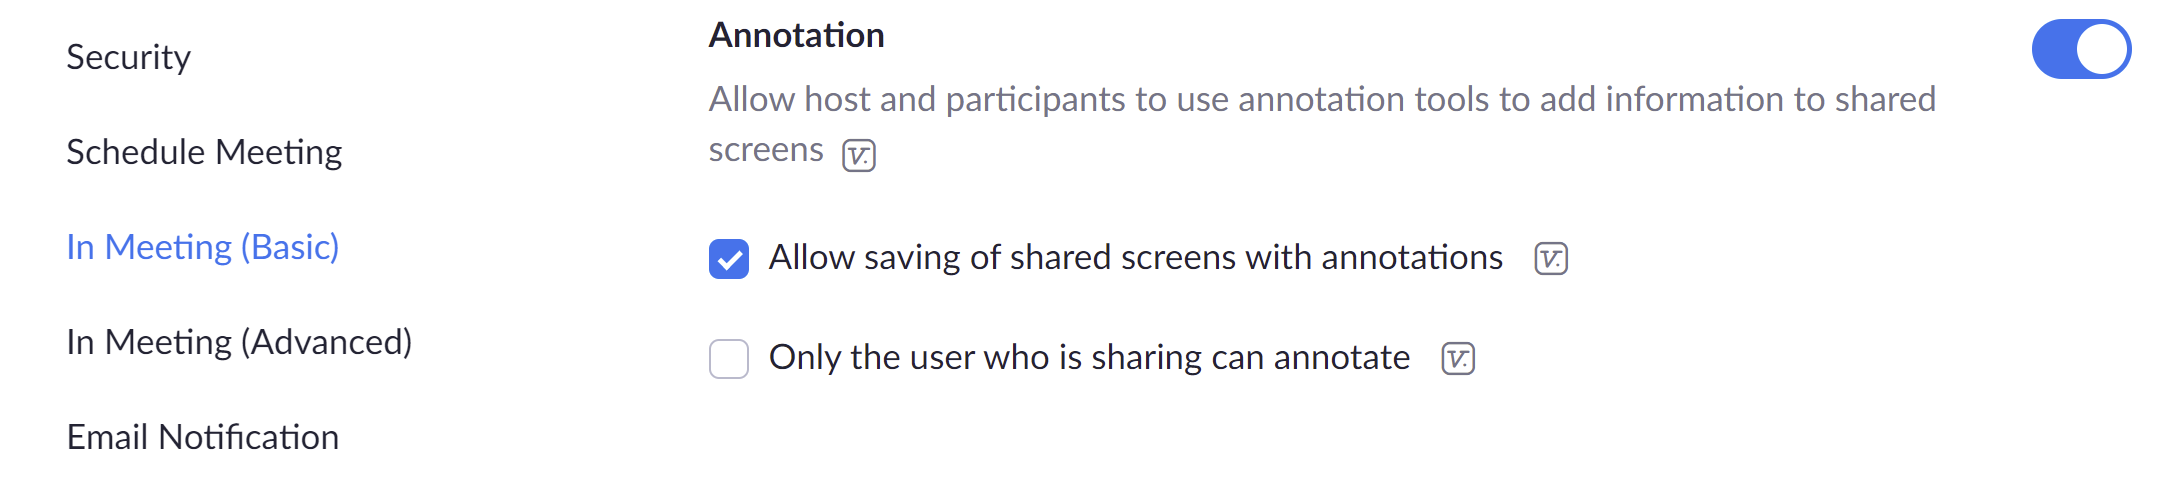
As the meeting host, you can decide if only the person sharing their screen can annotate (in your Zoom settings, see screenshot above), or for a more collaborative experience, if all meeting participants can annotate the shared screen.
How to Annotate When You are Using Screen Share
When you Share Screen, the annotation tool bar should open automatically. If not, click the pencil icon in your Zoom controls to open the Annotation tool bar.
The Annotation tool bar allows you to add text, draw (straight lines, shapes, or freeform drawing), add a stamp, spotlight (with an arrow or "laser pointer"), erase, change the format (such as color or text size), undo, redo, clear (all annotations, all of your annotations, or all of others' annotations), or save (the screen with the annotations as a PNG or PDF).
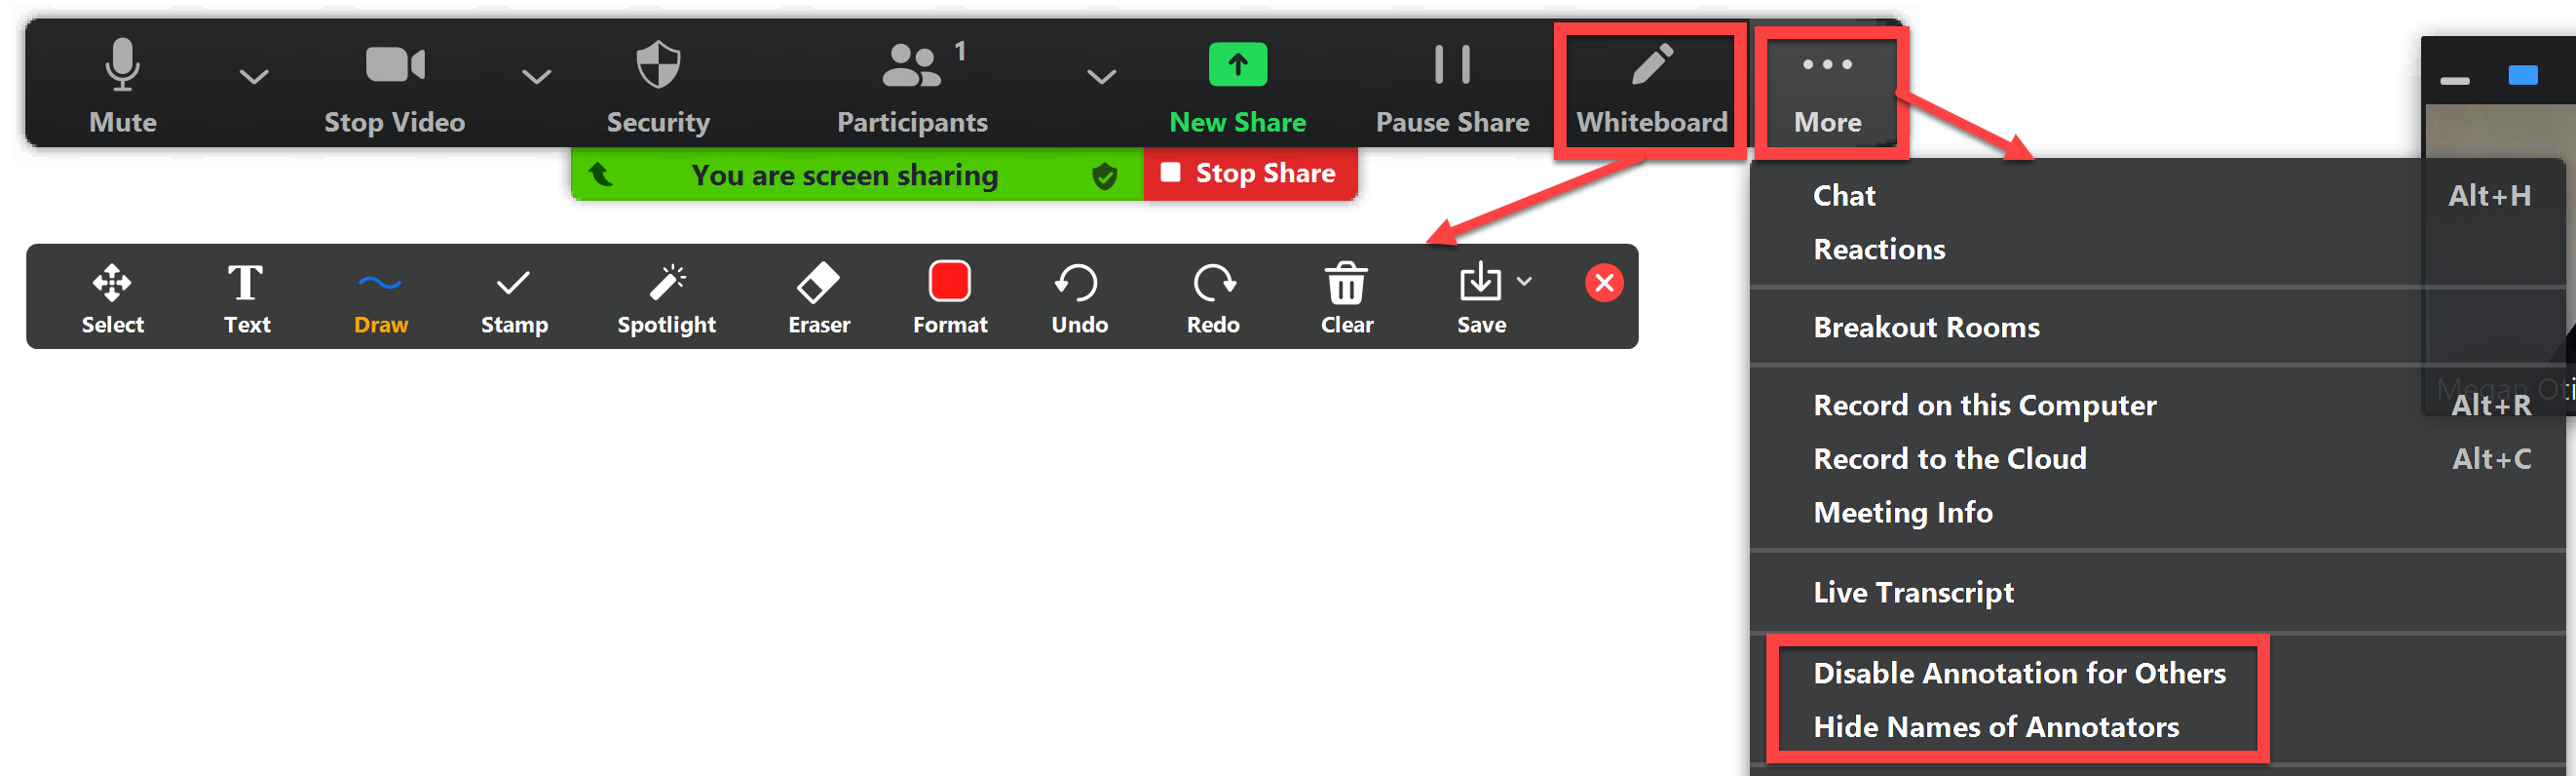
If you allow all meeting participants to annotate on the shared screen in the Settings, you can turn off this option at any time during the meeting by clicking the three dots [...]/More button. You can also help discourage inappropriate anonymous annotations by making sure annotators' names appear next to their annotations, though you can also hide the names of annotators if you wish.
How to Annotate When Someone Else is Using Screen Share
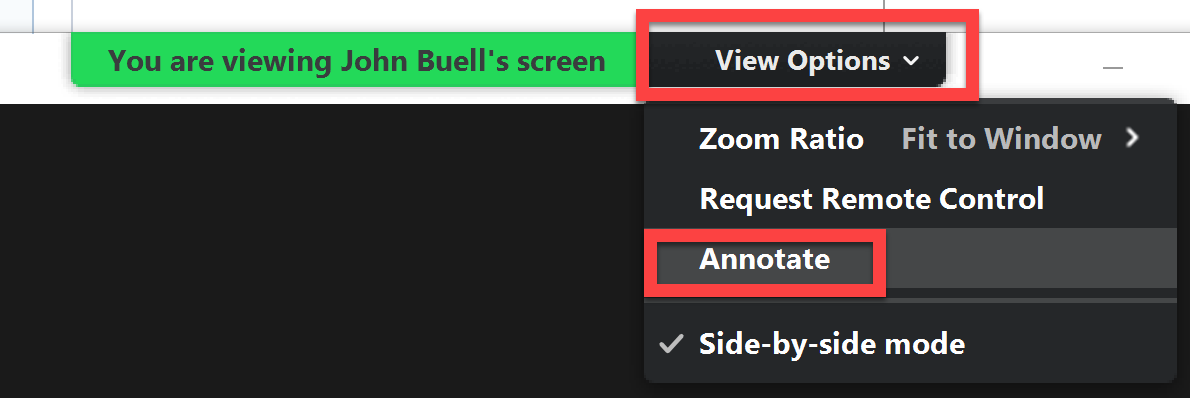
If the meeting host has enabled this option, when someone else is sharing their screen, at the very top of your Zoom window where it says in a green box "You are viewing X's screen," click View Options and then select Annotate. Then the Annotation tool bar will pop up and you will be able to draw on the shared screen.
Spotlight or Pin Guest Speakers or Multiple Presenters
Spotlighting Participants' Videos
As the meeting host or co-host, you may want to highlight the video(s) of a guest speaker or multiple presenters in order to focus your Zoom meeting participants' attention.
In this instance, you can use Zoom's spotlight feature to shine a spotlight on up to 9 meeting attendees. Adding a spotlight to one or more participants puts them as the primary active speakers for all participants, and your meeting participants will only see these speakers, even if they were viewing Gallery mode.
To add a spotlight to a meeting attendee, you must be either a host or co-host. Hover over a participant's video feed and click the three dots [...] and then select Spotlight for Everyone (for the first spotlight) or Add Spotlight (for subsequent spotlights). As the meeting host, you can add and remove the spotlight on yourself, or other guest speakers or student presentation groups. To remove the spotlight, click Remove Spotlight on the upper left corner of the video and everyone will return to active speaker view.
Pinning Participants' Videos
If you just want to focus your own view during your Zoom meeting, you can use Zoom's pinning feature.
If you are the host or co-host, you can pin up to 9 meeting participants. This disables the active speaker view, and the host will only view up to 9 specific speakers (but the host pinning speakers does not affect the view of other meeting participants). You can add and remove pins at any time.
If you are not the host or co-host, you can pin one other meeting participant (though the meeting host can give you permission to multi-pin). And if you are recording the meeting locally, your recording will be of the pinned speaker. Pinning another participant's video only affects your view and local recordings. It does not affect the view of other participants or cloud recordings.
One example of when this might be especially useful is if one of the meeting participants needs a sign language interpreter. Then that participant can pin the interpreter's video and that way they can always see the interpreter on their screen, regardless of who is actually speaking during the meeting.
To pin another participants' video, hover over a participant's video feed and click the three dots [...] and then select Pin. To remove the pin, click Remove Pin on the upper left corner of the video and you will return to Active Speaker view.
Use Your Phone or Tablet as a Document Camera
You can use your mobile phone or tablet's built-in camera as a document camera when you share your screen over Zoom.
iPhone or iPad
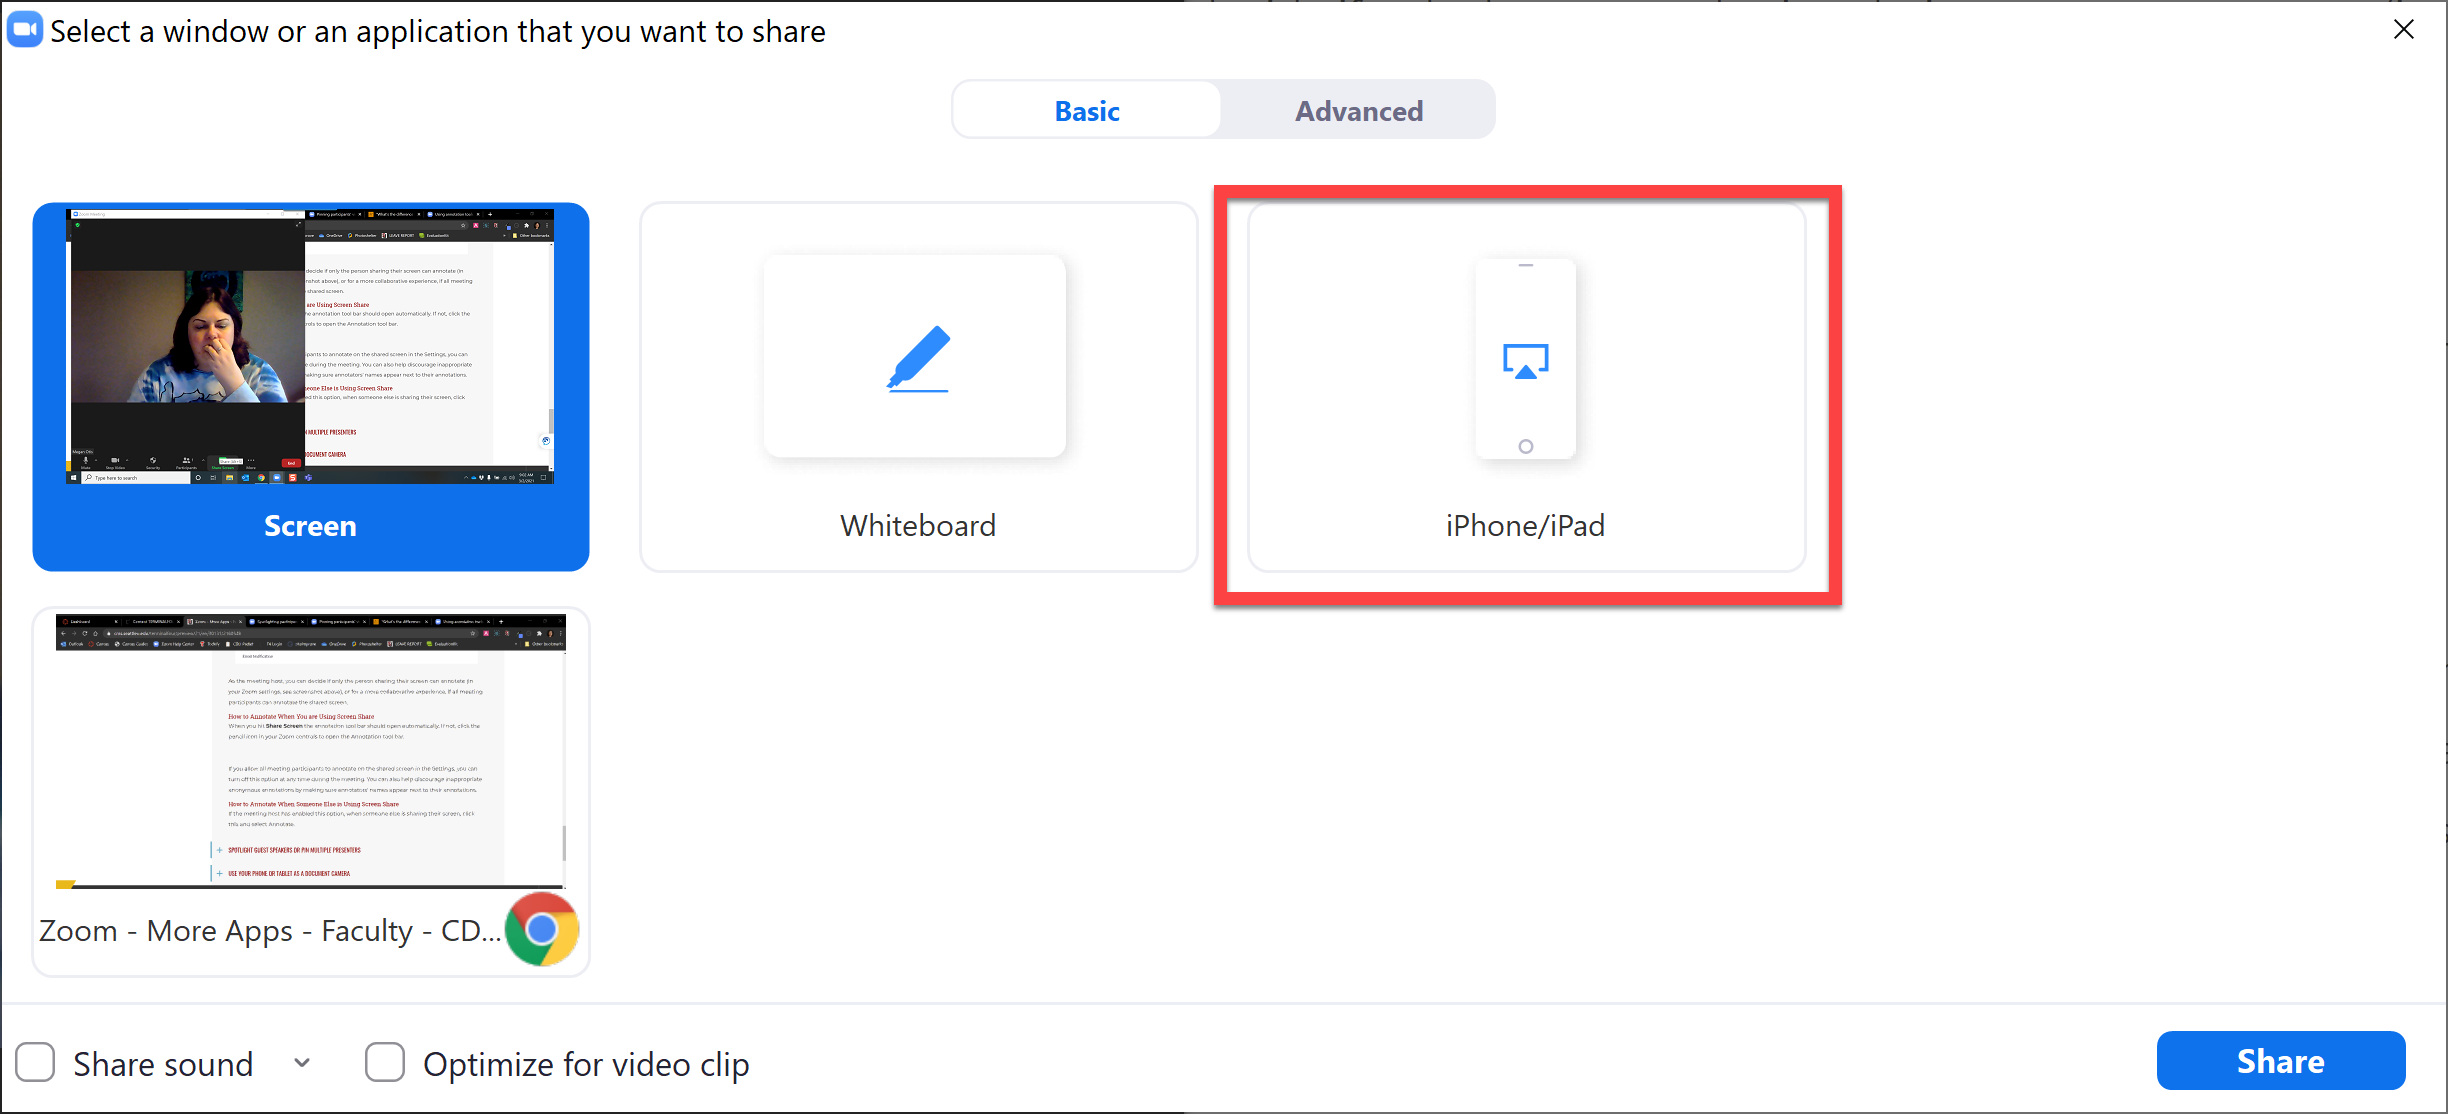
If you have an iPhone or iPad, you can easily share your iPhone or iPad screen when you click Share Screen and then select iPhone/iPad.
You will first need to make sure your iPhone or iPad is using the same network connection as your primary device (such as making sure your iPad is connected to the same WiFi network as your laptop).
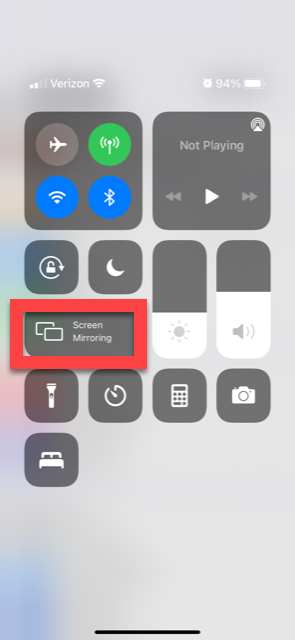
Then on your iPhone or iPad, you'll need to enable Screen Mirroring (by swiping down with two fingers from the top right hand of your screen).
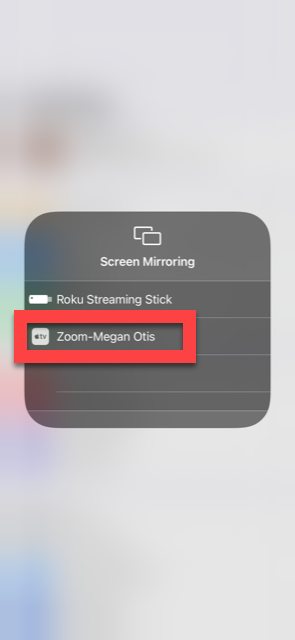
Then select the device you want to share your iPhone or iPad screen with (your primary device).
Then your iPhone or iPad screen will be shared to all your meeting participants. To use your iOS device as a document camera, get a tripod or prop your device up on a stack of books with the camera pointing down to the table top.
Android or Other Device
- Download the Zoom app to your Android or tablet.
- Since you cannot use your Seattle U-provided Zoom Pro account on multiple devices simultaneously, create a free Zoom account using a personal email address.
- Use a tripod or prop your Android or tablet up on a stack of books so that you can point your camera down onto your table top.
- Join your Zoom meeting both from your regular computer (so your students can see your face with your webcam) as well as with your Android or tablet (pro-tip to avoid getting audio feedback: do not join with computer audio on your second device).
- Then on your Android phone or other device, select "Share Screen" and open your device's camera app. This will share your device's camera feed with your Zoom meeting participants.